Tuning & Configuration
Dive into aim tuning, keybinding, macros, and flight/arcade stick configuration for ReaSnow S2.
Customize every aspect of your S2 setup.
| Page | What You’ll Learn |
|---|
| Aim Tuning | DPI, report rate, sensitivity basics, 50-point curve editor, and deadzone setup |
| Keybinding | Map keyboard and mouse buttons to controller inputs, combo keys, SAB, and vibration |
| Macro System | 10 groups × 50 macros with visual timeline editor — anti-recoil, combos, automation |
| Flight & Arcade Stick | Joystick axis mapping and arcade stick setup. Steering wheels are not supported |
1 - Aim Tuning
Mouse sensitivity, DPI, report rate, curve editor overview, and controller dead zone settings for ReaSnow S2.
This section covers everything related to mouse aim tuning on S2 — from basic sensitivity setup to the 50-point curve editor and dead zone configuration.
Before You Tune
Get these fundamentals right first:
| Setting | Recommendation |
|---|
| Mouse DPI | 4000–16000 (5000 recommended) |
| Mouse Report Rate | 250–1000 Hz (500 Hz recommended) |
| Mouse Acceleration | OFF (disable in mouse software) |
| In-Game Sensitivity | MAX (let S2 handle the curve, not the game) |
Set your mouse to the recommended DPI and report rate using your mouse manufacturer’s software or onboard DPI button before connecting to S2.
Sensitivity Parameters
These are adjusted in the APP’s Mouse Advanced Settings page.
| Parameter | Range | Default | Description |
|---|
| HIP Sensitivity | 1–5000 | Per-config | Sensitivity when not aiming down sights (hip-fire) |
| ADS Sensitivity | 1–5000 | Same as HIP | Independent sensitivity when aiming down sights |
| Vertical Ratio | 10%–200% | 100% | Vertical sensitivity as a percentage of horizontal |
| Minimum Speed | 0–100 | 0 | Ignores mouse movement below this threshold — filters out micro-jitter |
⚙️ Advanced: HIP and ADS each have independent sensitivity values. This lets you keep fast turning while hip-firing and a slower, more precise speed when scoped in.
Response Curve
S2 uses a 50-point Catmull-Rom spline curve that maps physical mouse movement to in-game stick output. Each point is a control node you can drag to reshape the response.
Learn how to use the curve editor in detail: Curve Editor
Dead Zone
If your aim drifts when you are not touching the mouse, or the crosshair moves too abruptly from a standstill, adjust the dead zone. This is also where you fine-tune the controller stick dead zone for authentication and gameplay.
Full reference: Deadzone Settings
Aim Assist
S2 offers two aim-assist algorithms for games that benefit from stick-acceleration-style reticle friction:
| Option | Behavior |
|---|
| A | Standard assist curve |
| B | Alternate assist curve — try this if A feels too aggressive |
| Off | No aim assist applied |
⚠️ Warning: Aim assist behavior varies by game. Test both options in your game’s practice range before committing to one.
Saving Your Settings
All aim parameters are automatically synced to S2’s RAM as you adjust them. To make settings permanent across power cycles, tap Save to Flash — otherwise changes are lost when S2 powers off.
1.1 - Curve Editor
50-point Catmull-Rom curve editor with 5 presets, free-hand drag editing, and per-game curve recommendations for ReaSnow S2.
The curve editor maps your physical mouse movement to in-game stick output. A well-tuned curve makes aiming feel natural — the crosshair moves exactly where you expect it to.

How It Works
S2 samples your mouse movement and translates it through a Catmull-Rom spline curve with up to 50 control points. The X axis represents physical mouse speed; the Y axis represents the stick output sent to the console. Each point is an anchor you can drag to reshape the response.
5 Preset Curves
Start from a preset, then fine-tune. Tap any preset to load it onto the canvas.
| Preset | Shape | Best For |
|---|
| Linear | Straight diagonal line | Default — stick output scales 1:1 with mouse speed. Start here if unsure. |
| Slow Start | Shallow ramp, steepens later | Precision at low speed — ideal for sniping and long-range tracking |
| Fast Start | Steep initial ramp, flattens later | Quick flick turns, close-quarters combat |
| S-Curve | Gentle S-shape | Balanced — fast flick with a precision zone in the middle |
| Custom | Your own shape | Start from any preset, then drag points to create your own curve |

Editing Controls
| Action | How To |
|---|
| Drag a point | Touch and drag any control point on the canvas |
| Add a point | Tap an empty spot on the curve to insert a new control node |
| Reset a point | Double-tap a control point to snap it back to default |
| X/Y Axis Lock | Lock horizontal or vertical movement for fine adjustment of one axis |
| Swap X/Y | Mirror the curve across the diagonal — unused for most setups, available for edge cases |
Axis Options
For specialized scenarios, you can lock or swap the response axes:
| Option | Effect |
|---|
| X Lock | Vertical adjustment only — curve affects Y-axis output |
| Y Lock | Horizontal adjustment only — curve affects X-axis output |
| Swap X/Y | Exchange X and Y axes — the curve editor applies to the opposite axis |
💡 Tip: Most players leave both axes unlocked. Use axis locking only if you need different horizontal vs. vertical response — e.g., reducing vertical bounce during anti-recoil macros.
Per-Game Recommendations
Each official Game Config ships with a recommended curve tuned for that specific game. When you install a Game Config from the library, the curve is included automatically.
To see what curve the config recommends, open the curve editor after loading the config — the preset and point positions reflect the author’s tuning.
1.2 - Deadzone Settings
Stick dead zone and trigger threshold configuration for ReaSnow S2 — per-game differences, inner/outer dead zone, and precise numeric input.
Dead zones define how much physical movement is ignored before S2 begins outputting a stick or trigger signal. Properly tuned dead zones eliminate drift, reduce unwanted movement, and make stick response feel consistent across different controllers.
Controller Stick Dead Zone
Two controllers can have their dead zones configured: the authentication controller (plugged into USB1) and the main controller (USB2–4).
| Parameter | Range | Description |
|---|
| Inner Dead Zone | 0–100 | Movement below this threshold is ignored. Higher = more stick movement required before output starts. |
| Outer Dead Zone | 0–100 | The maximum position before the stick is considered fully tilted. Lower = reaches 100% output sooner. |
Authentication vs. Main Controller
| Controller | USB Port | When to Adjust |
|---|
| Guide (Auth) | USB1 | If the authentication controller’s stick is visibly drifting on the IO Monitor |
| Main | USB2–4 | If your gameplay controller’s stick feels too sensitive or not responsive enough at the edges |
Trigger Dead Zone
Configure the inner and outer dead zone for analog triggers (L2/R2) on connected controllers.
| Parameter | Range | Description |
|---|
| Trigger Inner Dead Zone | 0–100 | How far you must pull the trigger before output begins |
| Trigger Outer Dead Zone | 0–100 | How far before the trigger reaches 100% output |
Trigger dead zones are useful for games where you want a hair-trigger response (lower inner dead zone) or need to prevent accidental trigger activation (higher inner dead zone).
Every dead zone slider supports precise numeric entry. Tap the value to open an input box and type the exact number you want — no need to guess with the slider.
Dead Zone Shape
For the main controller sticks, choose between two dead zone shapes in the Game Settings page (alongside keybinding configuration):
| Shape | Behavior |
|---|
| Circle | Equal dead zone in all directions. Best for most games. |
| Rectangle | Independent X and Y thresholds. Useful for games with strong horizontal-vertical aim asymmetry. |
💡 Tip: Start with Circle and a low inner dead zone (5–10). Increase only if you notice stick drift on the IO Monitor.
Per-Game Differences
Different games interpret stick input differently. A dead zone that works for one FPS may cause sluggish aim in another. Always test after changing:
- Open the IO Monitor to see real-time stick values.
- Move the stick to the edges — verify both X and Y reach 100%.
- Release the stick — verify both axes return to 0.
- Adjust the inner dead zone up if values do not settle at 0, or adjust the outer dead zone down if values do not reach 100%.
⚠️ Warning: Setting the inner dead zone too high can create a “jump” when the stick passes the threshold. Keep the inner dead zone as low as your hardware allows.
2 - Macro System
Macro recording, editing, and group management on ReaSnow S2 — 10 groups, 50 macros each, visual timeline editor, anti-recoil, and 7 real-world scenarios.
S2’s macro system lets you record and play back sequences of button presses with millisecond precision. Use it for anti-recoil patterns, movement combos, rapid building, and any repeated input sequence.
Macro Structure
| Level | Capacity | Description |
|---|
| Macro Groups | 10 | Each group is a container with its own activation hotkeys and trigger behavior |
| Macros per Group | 50 | Each macro is a sequence of timed button events |
| Steps per Macro | Unlimited | Limited only by S2’s internal Flash capacity |
Think of a group as a “loadout” for one game or playstyle. Switch between groups to change your entire macro setup.
Group Settings
Each macro group has independent settings:
| Setting | Options | Description |
|---|
| Activation Hotkeys | 4 per group | Key combos that activate macros within this group |
| Trigger Mode | Hold / Toggle / Press / Release / Double Press | How the activation hotkey triggers the macro |
| Execution Mode | Single / Parallel / Loop | Whether macros run one-at-a-time, simultaneously, or on repeat |
Trigger Modes
| Mode | Behavior |
|---|
| Hold | Macro runs while the hotkey is held down; stops on release |
| Toggle | Press once to start, press again to stop |
| Press | Fires once on key-down, runs to completion |
| Release | Fires once on key-up |
| Double Press | Fires when the key is pressed twice quickly |
Execution Modes
| Mode | Behavior |
|---|
| Single | One macro runs at a time. Pressing a new hotkey stops the current macro. |
| Parallel | Multiple macros can run simultaneously. Useful for combining anti-recoil + movement. |
| Loop | The macro repeats continuously while the hotkey is held. Stops on release. |
Macro Editor
The visual timeline editor is the core of macro creation. Each row is a time step; each column is an action.

| Parameter | Options | Description |
|---|
| Name | Up to 20 bytes | Macro display name |
| Type | Common / Anti Recoil | Anti-recoil macros auto-activate in ADS scenarios |
| Scope | All / HIP / ADS / HIP+ADS | When the macro is allowed to run |
| Term Mode | Immediately / Until Last Line | Immediately = stop instantly on hotkey release; Until Last Line = finish current loop iteration |
| Timeline | Visual drag editor | Add keyboard, mouse, and controller actions — each with its own duration |
💡 Tip: Use the Play Test button to preview the macro in the editor before saving it to S2. The IO Monitor shows exactly what the macro outputs.
Anti-Recoil Macros
Anti-recoil macros are specialized macros that compensate for vertical weapon kick during ADS:
| Feature | Description |
|---|
| Type: Anti Recoil | Marks the macro as a recoil-control sequence |
| Scope: ADS | Only activates when aiming down sights |
| Automatic Activation | Fires automatically on ADS — no separate hotkey needed |
Create a short sequence of downward stick movements timed to your weapon’s fire rate. The macro editor’s ms-level precision lets you match the recoil pattern exactly.
Macro Element Selector
When adding actions to the timeline, choose from three input categories:
| Category | Examples |
|---|
| Keyboard | Any key — WASD, numbers, function keys |
| Mouse | Left/Right/Middle click, side buttons, scroll wheel, DPI button |
| Controller | Face buttons, D-pad, bumpers, triggers, stick clicks |
7 Scenario Examples
These real-world examples show what the macro system can do:
| # | Scenario | What It Does | Trigger Mode |
|---|
| 1 | Recoil Control | Downward stick nudges timed to weapon fire rate — compensates vertical recoil | Hold (ADS) |
| 2 | Bunny Hop | Repeated jump inputs at a fixed interval for sustained movement speed | Hold |
| 3 | Fast Build | Sequence of build-mode button presses — wall, ramp, floor in one key | Press |
| 4 | Crouch Shot | Crouch → fire → stand — strafes while ducking in and out of cover | Toggle |
| 5 | Touchpad Action | Simulates PS4/PS5 touchpad press for games that use it as a map or menu button | Press |
| 6 | Auto Loot | Rapid interact button presses to vacuum up loot in battle royale games | Hold |
| 7 | Combo Chain | Multi-step combo of attacks or abilities chained with precise timing | Press |
Recording a Macro
- Open the macro editor for the target macro slot.
- Tap the Record button.
- Press keys and buttons on your connected devices — S2 captures timing and order.
- Tap Stop to finish.
- Use the timeline editor to adjust timing, add delays, or insert new actions.
- Tap Play Test to preview.
- Save to Flash to persist to S2.
⚠️ Warning: Macros are saved to RAM automatically as you edit. Tap Save to Flash before powering off S2, or your changes will be lost.
3 - Keybinding
Button mapping, combo keys, SAB analog stick, and vibration settings on ReaSnow S2 — full mapping entries, 4 modes, 40 combo slots.
Keybinding translates your keyboard and mouse inputs into controller outputs. Each mapping tells S2: “when this key is pressed, send that controller button to the console.”
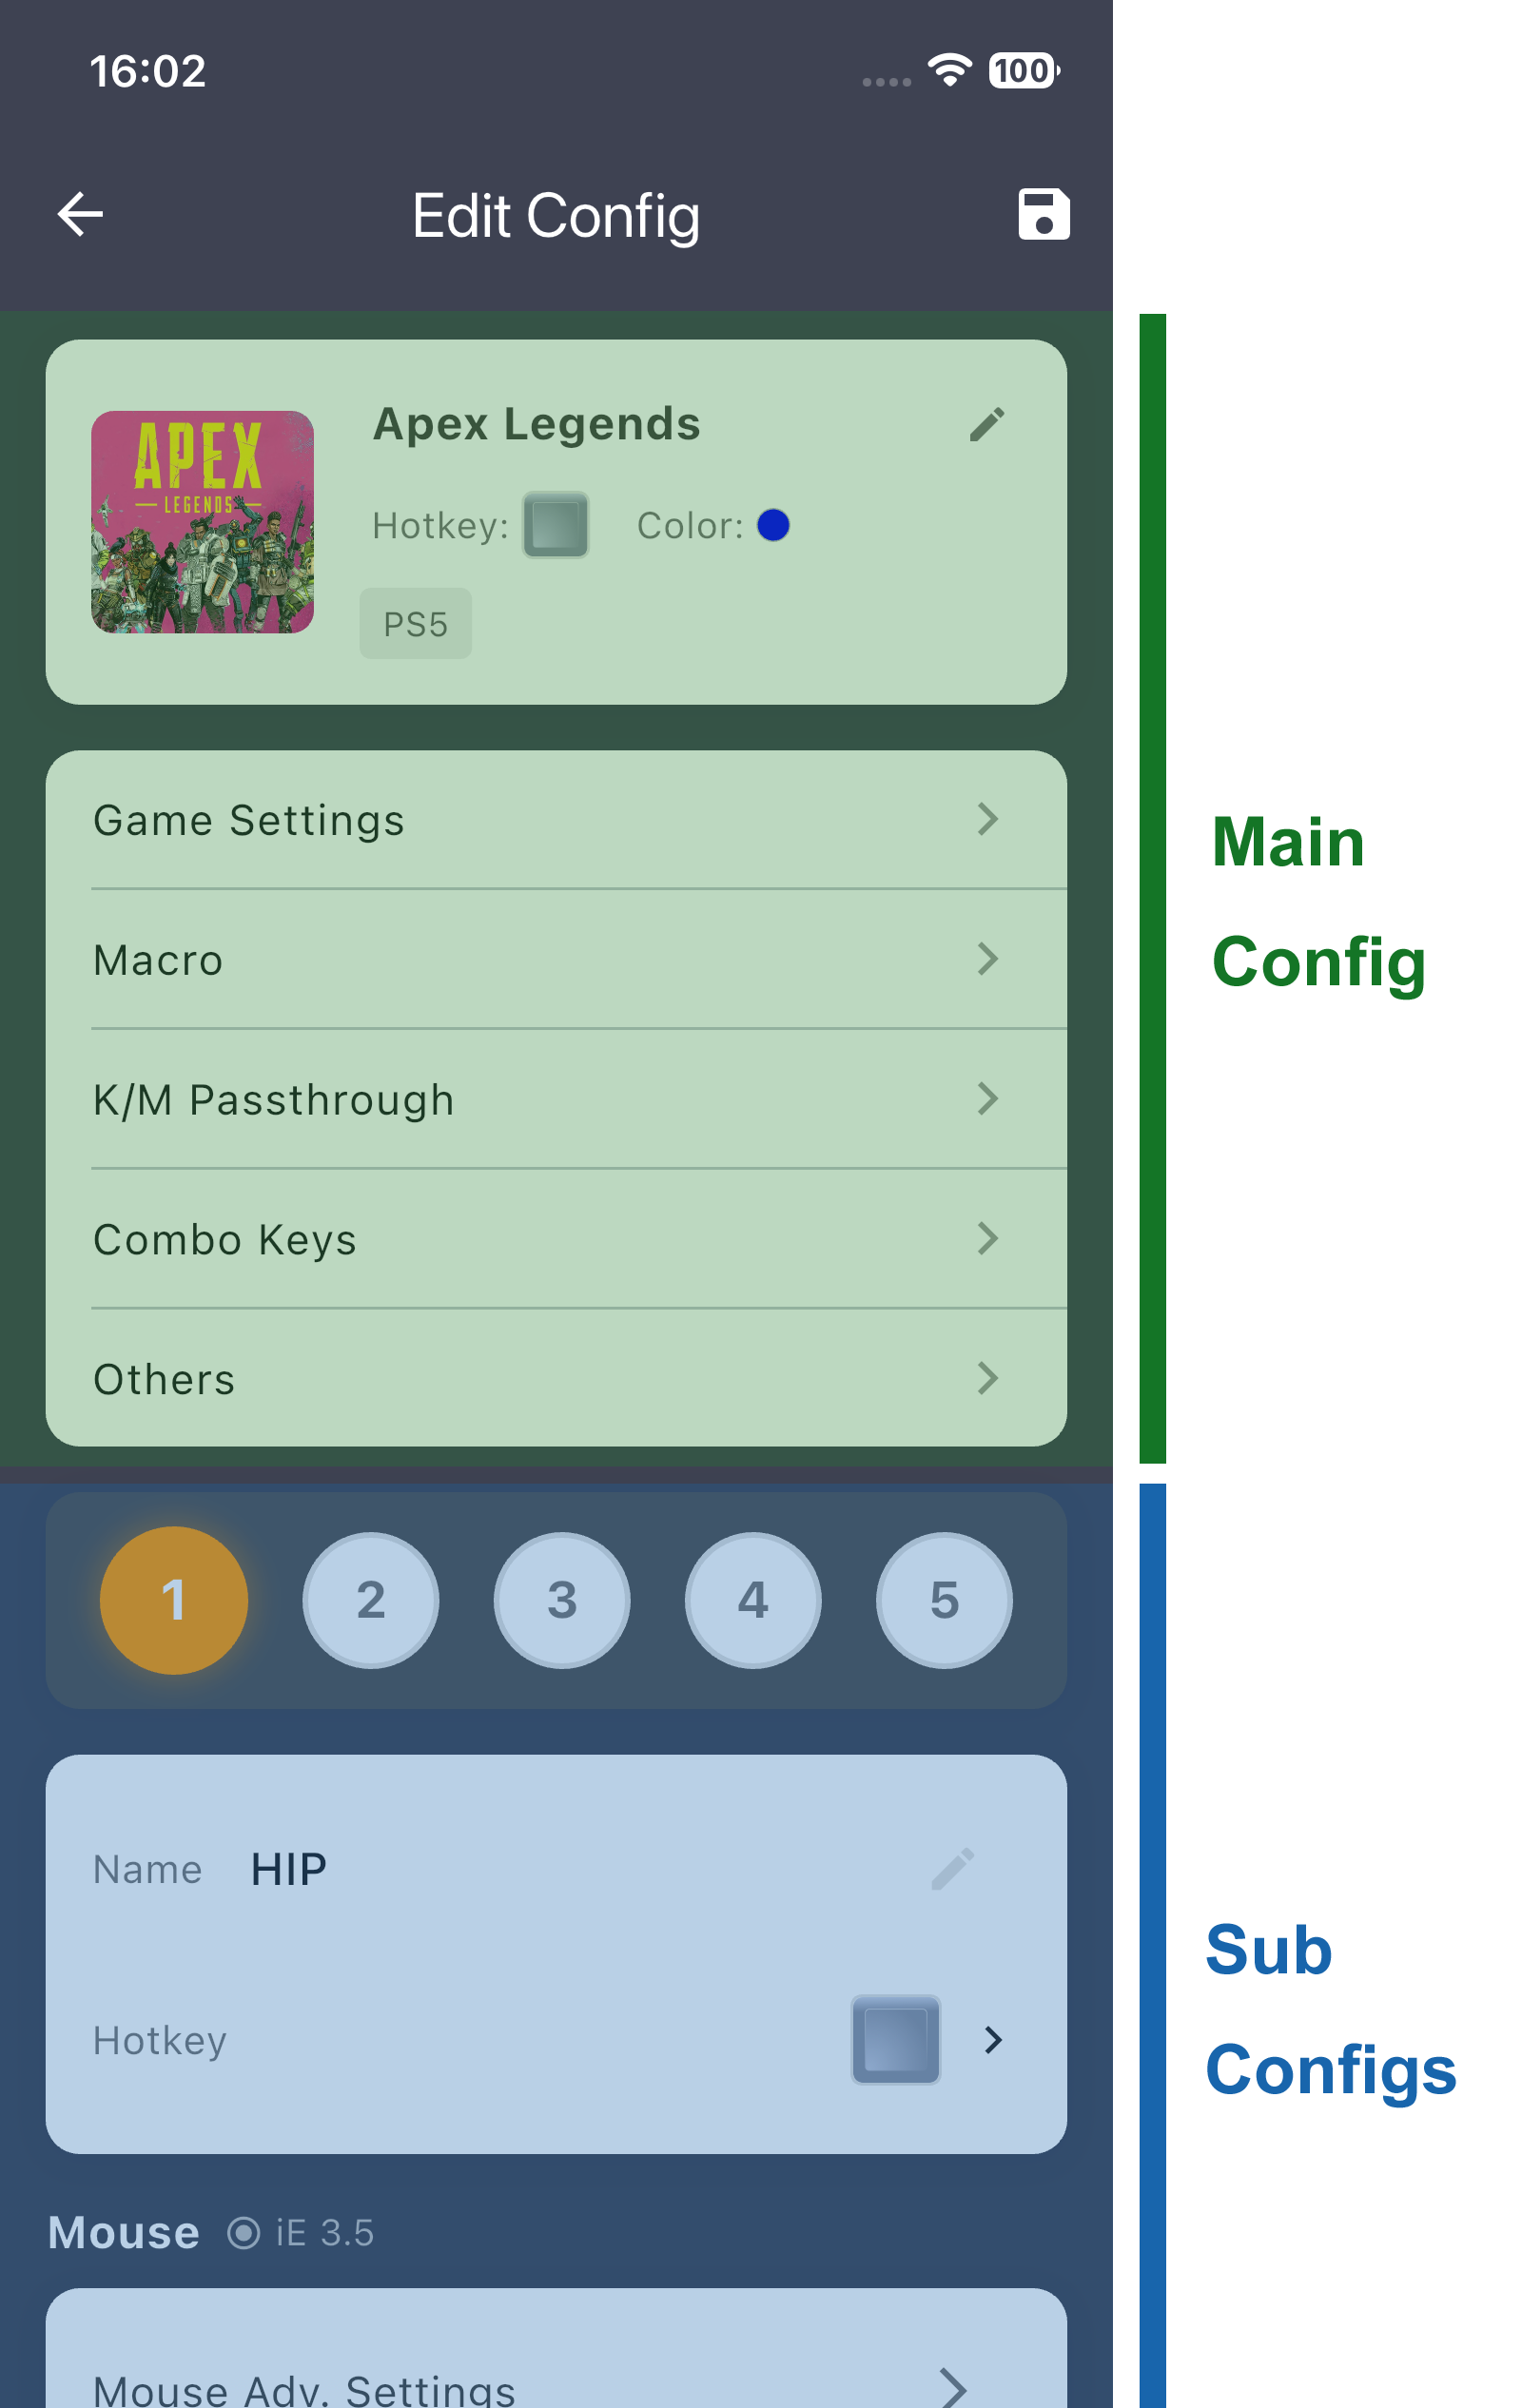
Config Structure
| Element | Capacity | Description |
|---|
| Main Config | 1 | The primary configuration — game name, platform, activation hotkey, etc |
| Sub Configs | 5 (HIP / ADS / TBD1 / TBD2 / TBD3) | Context-specific overrides — e.g., different mappings for hip-fire vs. ADS |
Sub configs let you switch mapping layouts by context. For example, a sniper button that changes scope while ADS uses one mapping in the HIP config and a different one in the ADS config.
Sub Config Inheritance
Sub configs 2–5 can inherit mappings from the HIP config:
- ADS inherits from HIP
- TBD1 inherits from HIP
- TBD2 inherits from HIP
- TBD3 inherits from HIP
Inheritance means you use the same mappings.
| Mode | Behavior |
|---|
| Disabled | This sub config has its own independent mappings |
| Enabled | This sub config use the same mappings just as the HIP config |
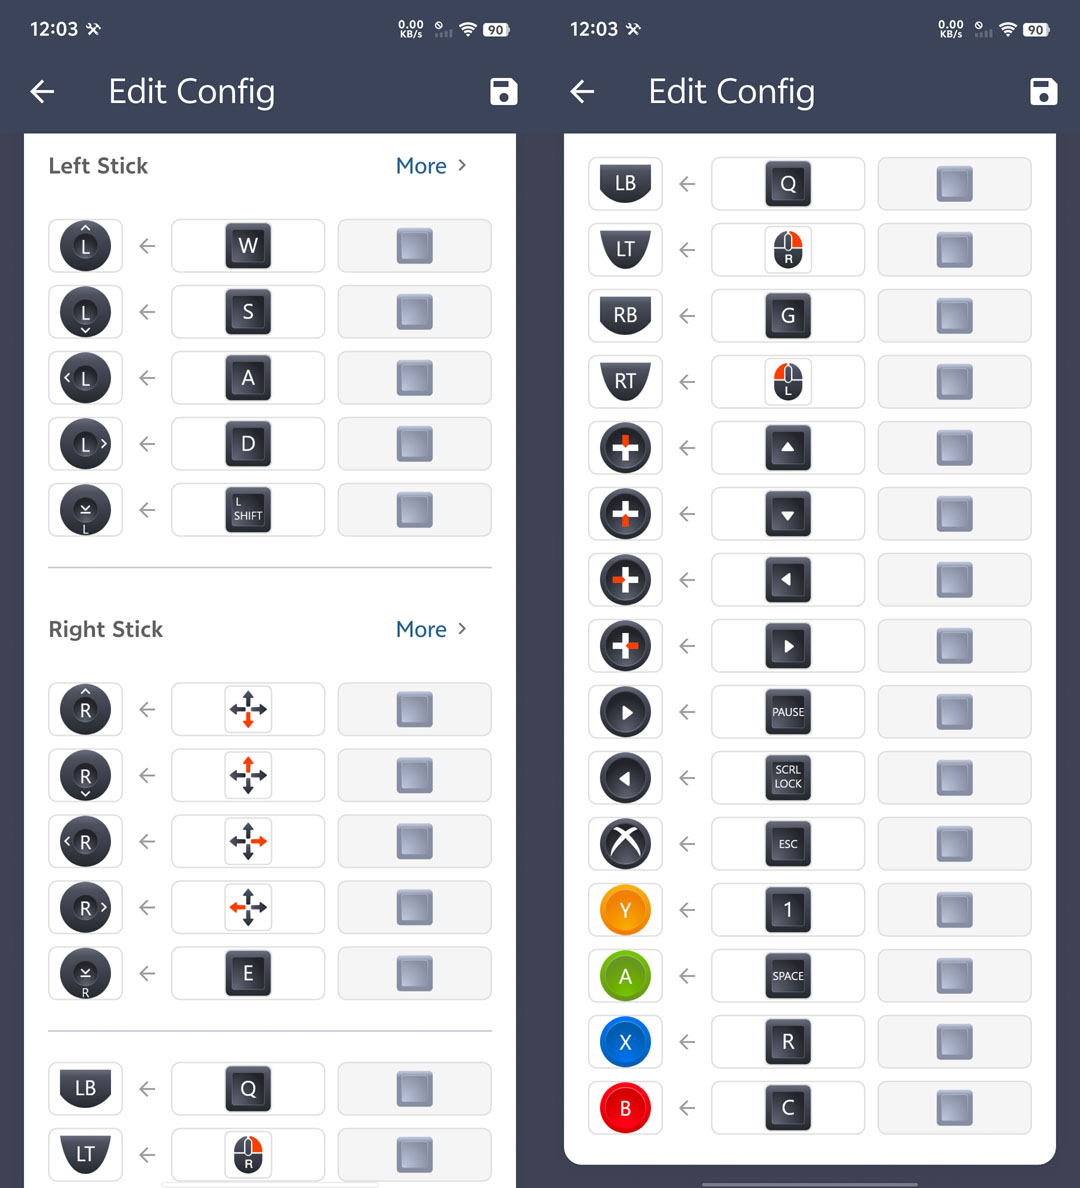
Keybinding List
The mapping list shows all slots with their default keys and target outputs:
Mapping Methods
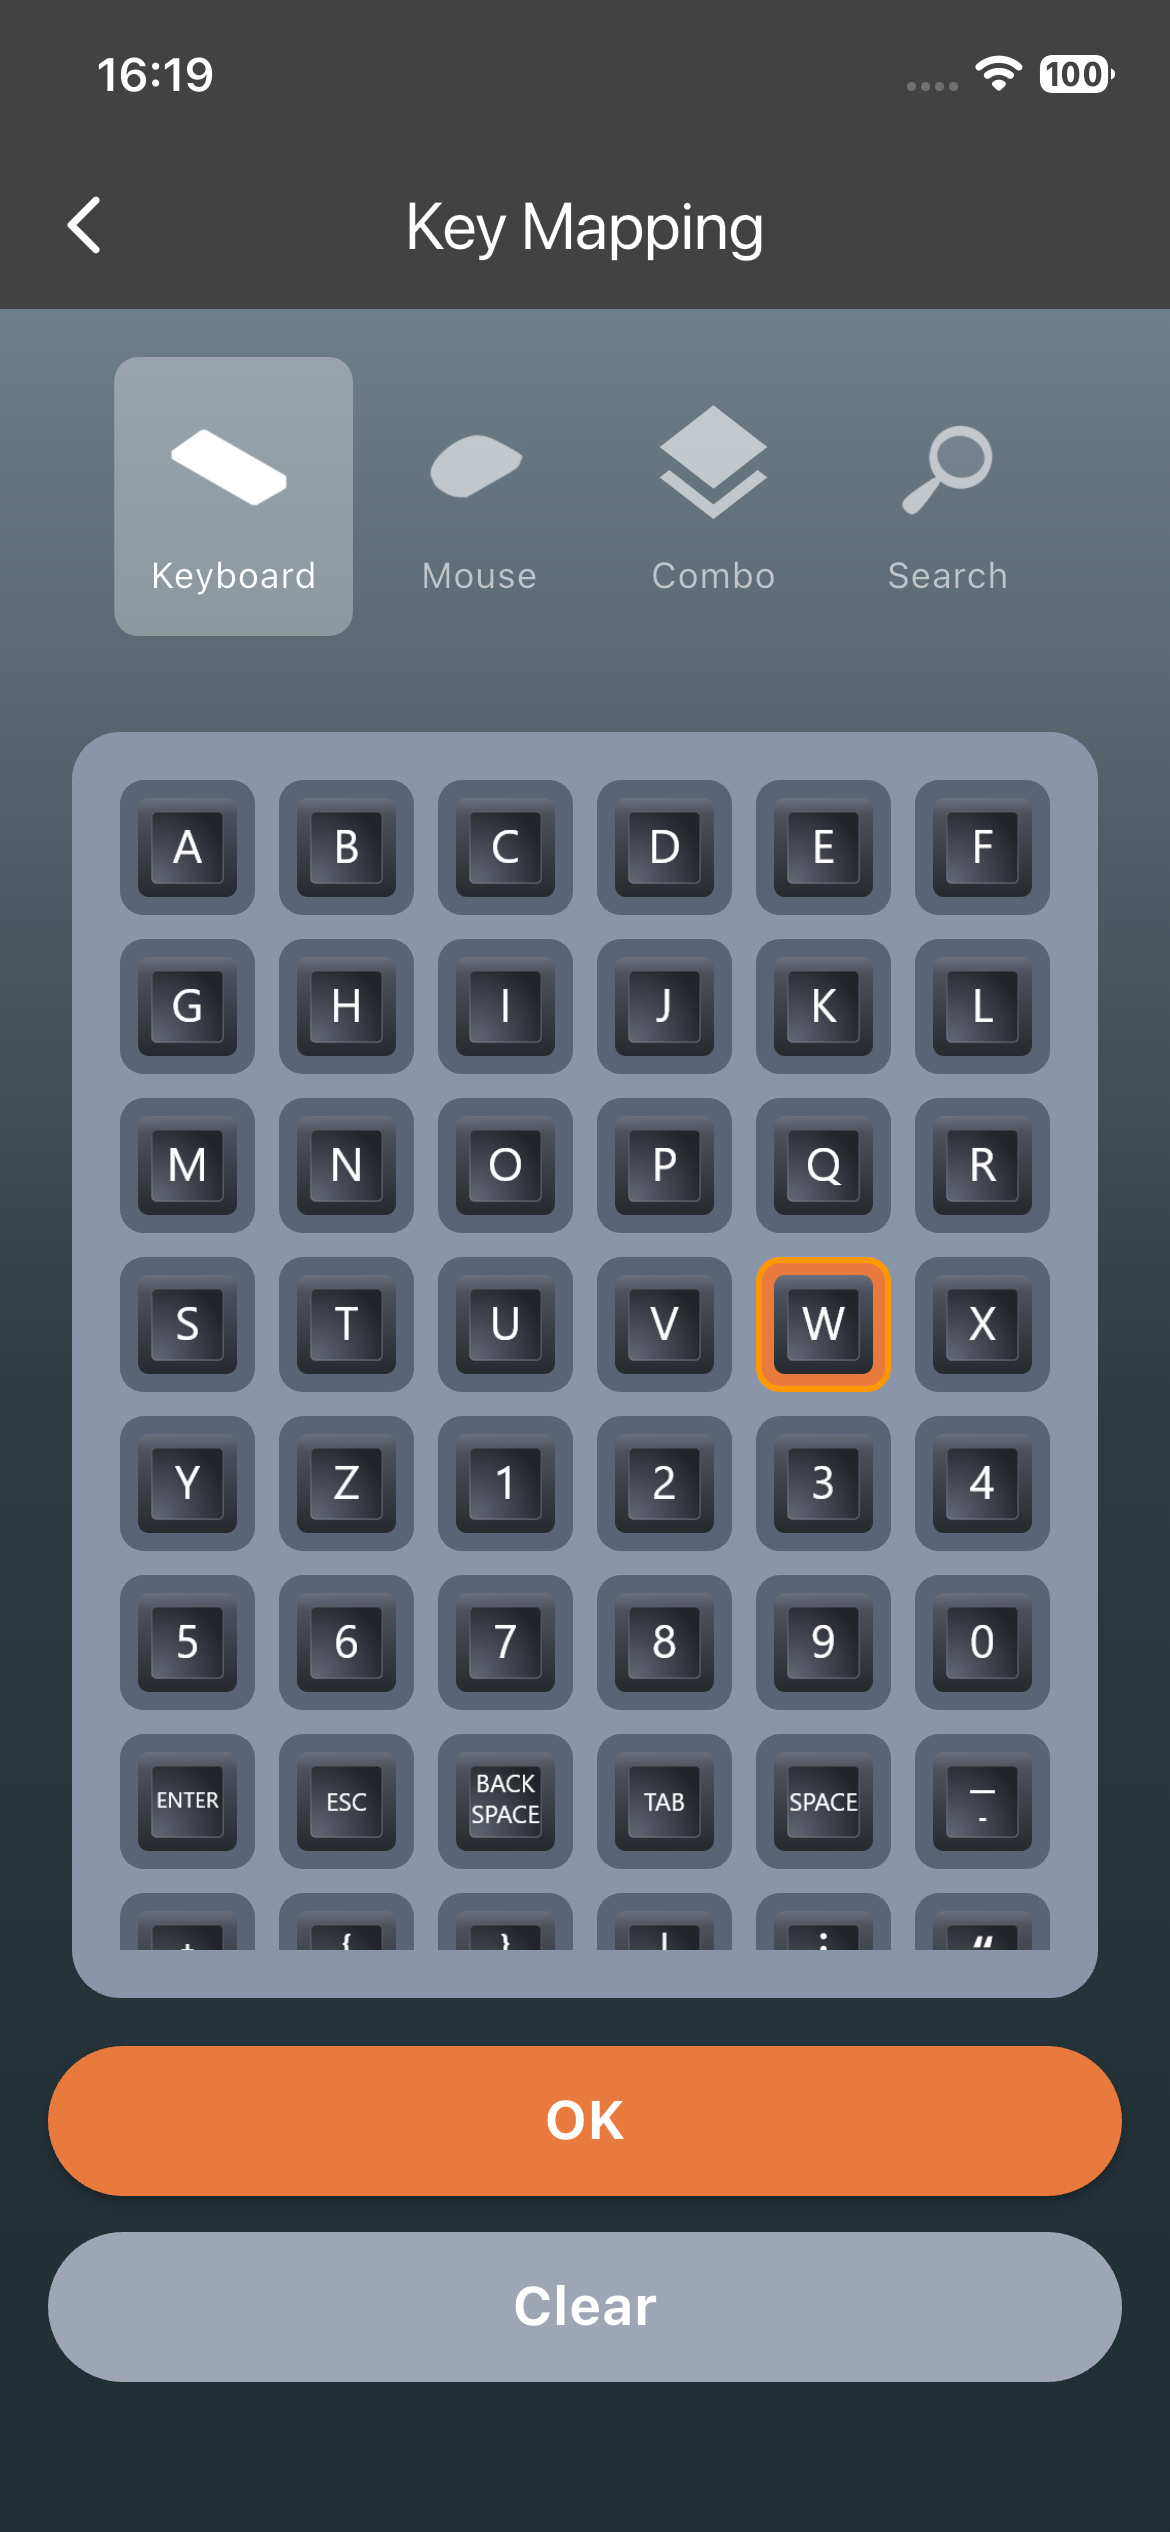
| Input Method | Description |
|---|
| Keyboard | Browse a visual grid of all keyboard keys with icons |
| Mouse | Left/Right/Middle/Side/Scroll Wheel/Mouse movements |
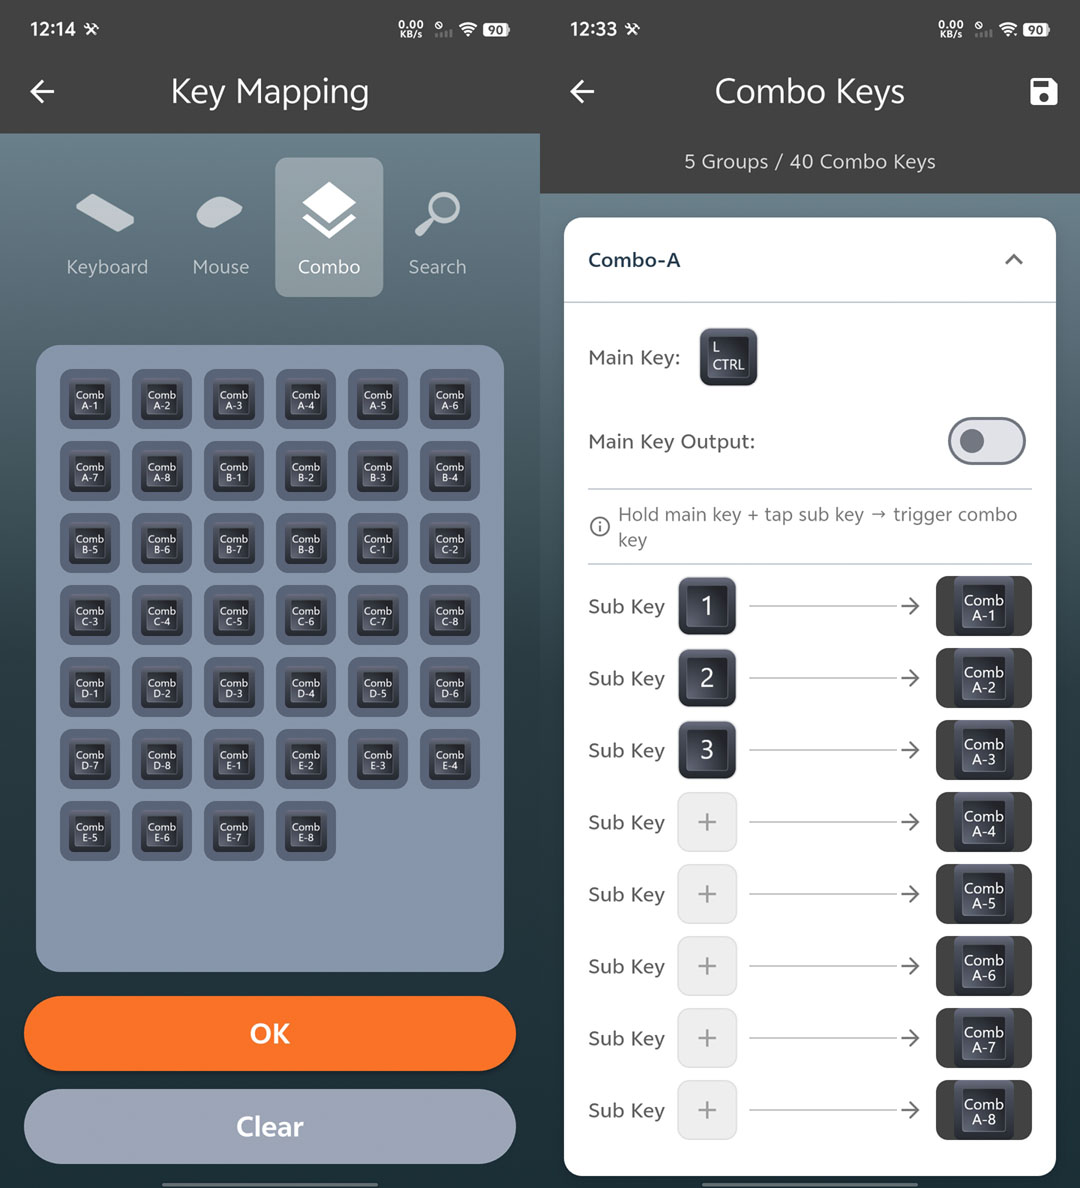
| Combo Keys | pre-defined combination keys |
| Search | Press the physical buttons on devices plugged into S2 — APP captures the key code in real time |
⚙️ Advanced — Search: Instead of picking from a grid, you press the actual key you want to use, and S2 learns it instantly. This is the fastest way to set a hotkey, especially for unusual keyboards.
Combo Keys
A combo combines two input keys (from keyboard, mouse, controller, or any compatible device) into a single virtual key,
which is then mapped to a controller button output or used to activate a feature.
| Parameter | Value |
|---|
| Combo Groups | 5 |
| Slots per Group | 8 |
| Max Combos | 40 |
Each combo group holds 8 combo entries. Press the two assigned input keys simultaneously to trigger the virtual key,
useful for actions that benefit from two-handed input or to create unique shortcuts that avoid normal-key conflicts.
💡 Tip: Combo Keys should be set properly in the “Combo Keys” page before its usage
Analog Behavior
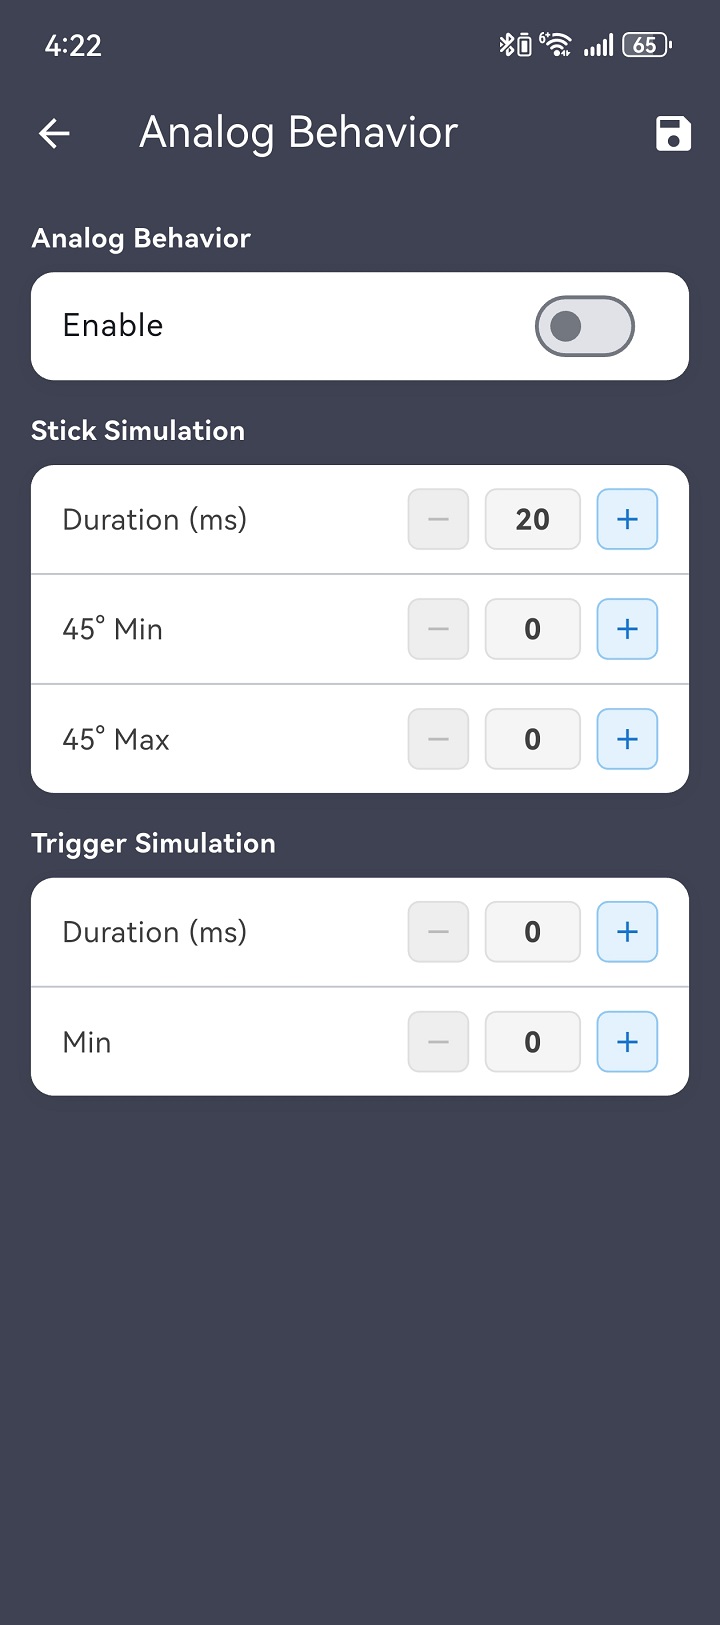
AB converts a digital key press into a timed analog stick/trigger movement - the controller sees the stick/trigger move, not a button press.
| Parameter | Range | Description |
|---|
| Enable | ON / OFF | Toggle AB for this sub config |
| Duration | 20–5000 ms | How long the analog stick moves |
| 45° Min/Max | 45°-89° | Defines the angular output range when W+A or W+D is pressed together. Min sets the lower-angle bound, Max sets the upper-angle bound, controlling how sharp or wide the diagonal feels. |
💡 Tip: A game requires analog-style input for certain actions — AB converts a key press into that analog signal.
Vibration
Route vibration feedback to a connected controller:
| Parameter | Options | Description |
|---|
| Device | None / USB1 / USB2–4 | Which physical controller receives vibration |
| Intensity | 0–100 | Vibration strength |
Saving Keybindings
Keybindings auto-sync to S2’s RAM as you edit. Changes are temporary until you tap Save to Flash — do this before powering off, or your mapping setup will revert.
4 - Flight & Arcade Stick
Flight stick, HOTAS, and arcade stick configuration on ReaSnow S2 — axis mapping, stick speed, and gyro-to-stick. Steering wheels are not supported.
S2 supports flight sticks (including standalone throttles), arcade sticks, and gyro-to-stick conversion. This page covers axis mapping, speed limits, and dead zone configuration for these peripherals.
⚠️ Warning: Steering wheels, pedals, force feedback, and any racing wheel subsystems are not supported on S2. See Specifications for the full unsupported features list.
Supported Peripherals
| Category | Status | Notes |
|---|
| Flight Stick (Joystick) | ✅ | Including HOTAS setups |
| Standalone Throttle | ✅ | Independent throttle quadrant devices |
| Arcade Stick | ✅ | — |
| Gyro-to-Stick | ✅ | Gyroscope sensor input converted to analog stick output |
| Steering Wheel | ❌ | Explicitly unsupported |
Stick Settings
These apply to both analog sticks detected by S2:
| Parameter | Range | Description |
|---|
| Left Stick Max Speed | 0–100 | Caps left stick movement speed. Lower = slower max tilt. |
| Right Stick Max Speed | 0–100 | Caps right stick movement speed. |
| Stick Dead Zone | 0–100 | Movement below this threshold is ignored. Eliminates drift from worn joysticks. |
| Speed Toggle Hotkey | Configurable | Assign a key to switch between full speed and capped speed mid-game |
Gyro-to-Stick
S2 can translate gyroscope motion from a supported controller into analog stick output — enabling motion-based aiming in games that do not natively support gyro.
| Feature | Detail |
|---|
| Gyro input source | Built-in gyroscope on supported controllers |
| Output | Converted to right stick analog values |
| Use case | Motion aiming in FPS games on platforms without native gyro support |
💡 Tip: Gyro-to-stick sensitivity is controlled through the stick speed settings above. Increase right stick max speed for faster gyro response.
Flight Stick Axis Mapping
Each analog axis on a flight stick can be mapped independently to any S2 input port:
| Setting | Options | Description |
|---|
| USB Port | USB1–4 | Which physical USB port the flight stick is connected to |
| Axis Type | X / Y / Z / Rx / Ry / Rz / Slider | 7 axis types — select based on your stick’s physical axes |
| Mapping Target | Independent per-axis | Each axis maps to a specific S2 input channel |
| Dead Zone | 0–100 | Axis dead zone — per-axis, not global |
A typical HOTAS maps:
- X axis → Roll (ailerons)
- Y axis → Pitch (elevator)
- Z axis → Rudder (twist or pedal)
- Slider → Throttle
Stick Response Curves
Multiple response curve types are available for analog sticks — choose based on your game and playstyle:
| Curve Type | Best For |
|---|
| Linear | Default — 1:1 stick-to-output mapping |
| Slow Start | Precision around center — flight sim formation flying |
| Fast Start | Quick response — dogfighting, arcade games |
Select the curve in the stick settings page. The curve applies to the analog stick output, similar to how the mouse curve editor controls mouse-to-stick translation (see Curve Editor).