ReaSnow S2
ReaSnow 3rd-Gen multi-platform gaming converter — mobile-controlled, 6-port, with IO monitor, 50-point curve editor, and config-sharing ecosystem.
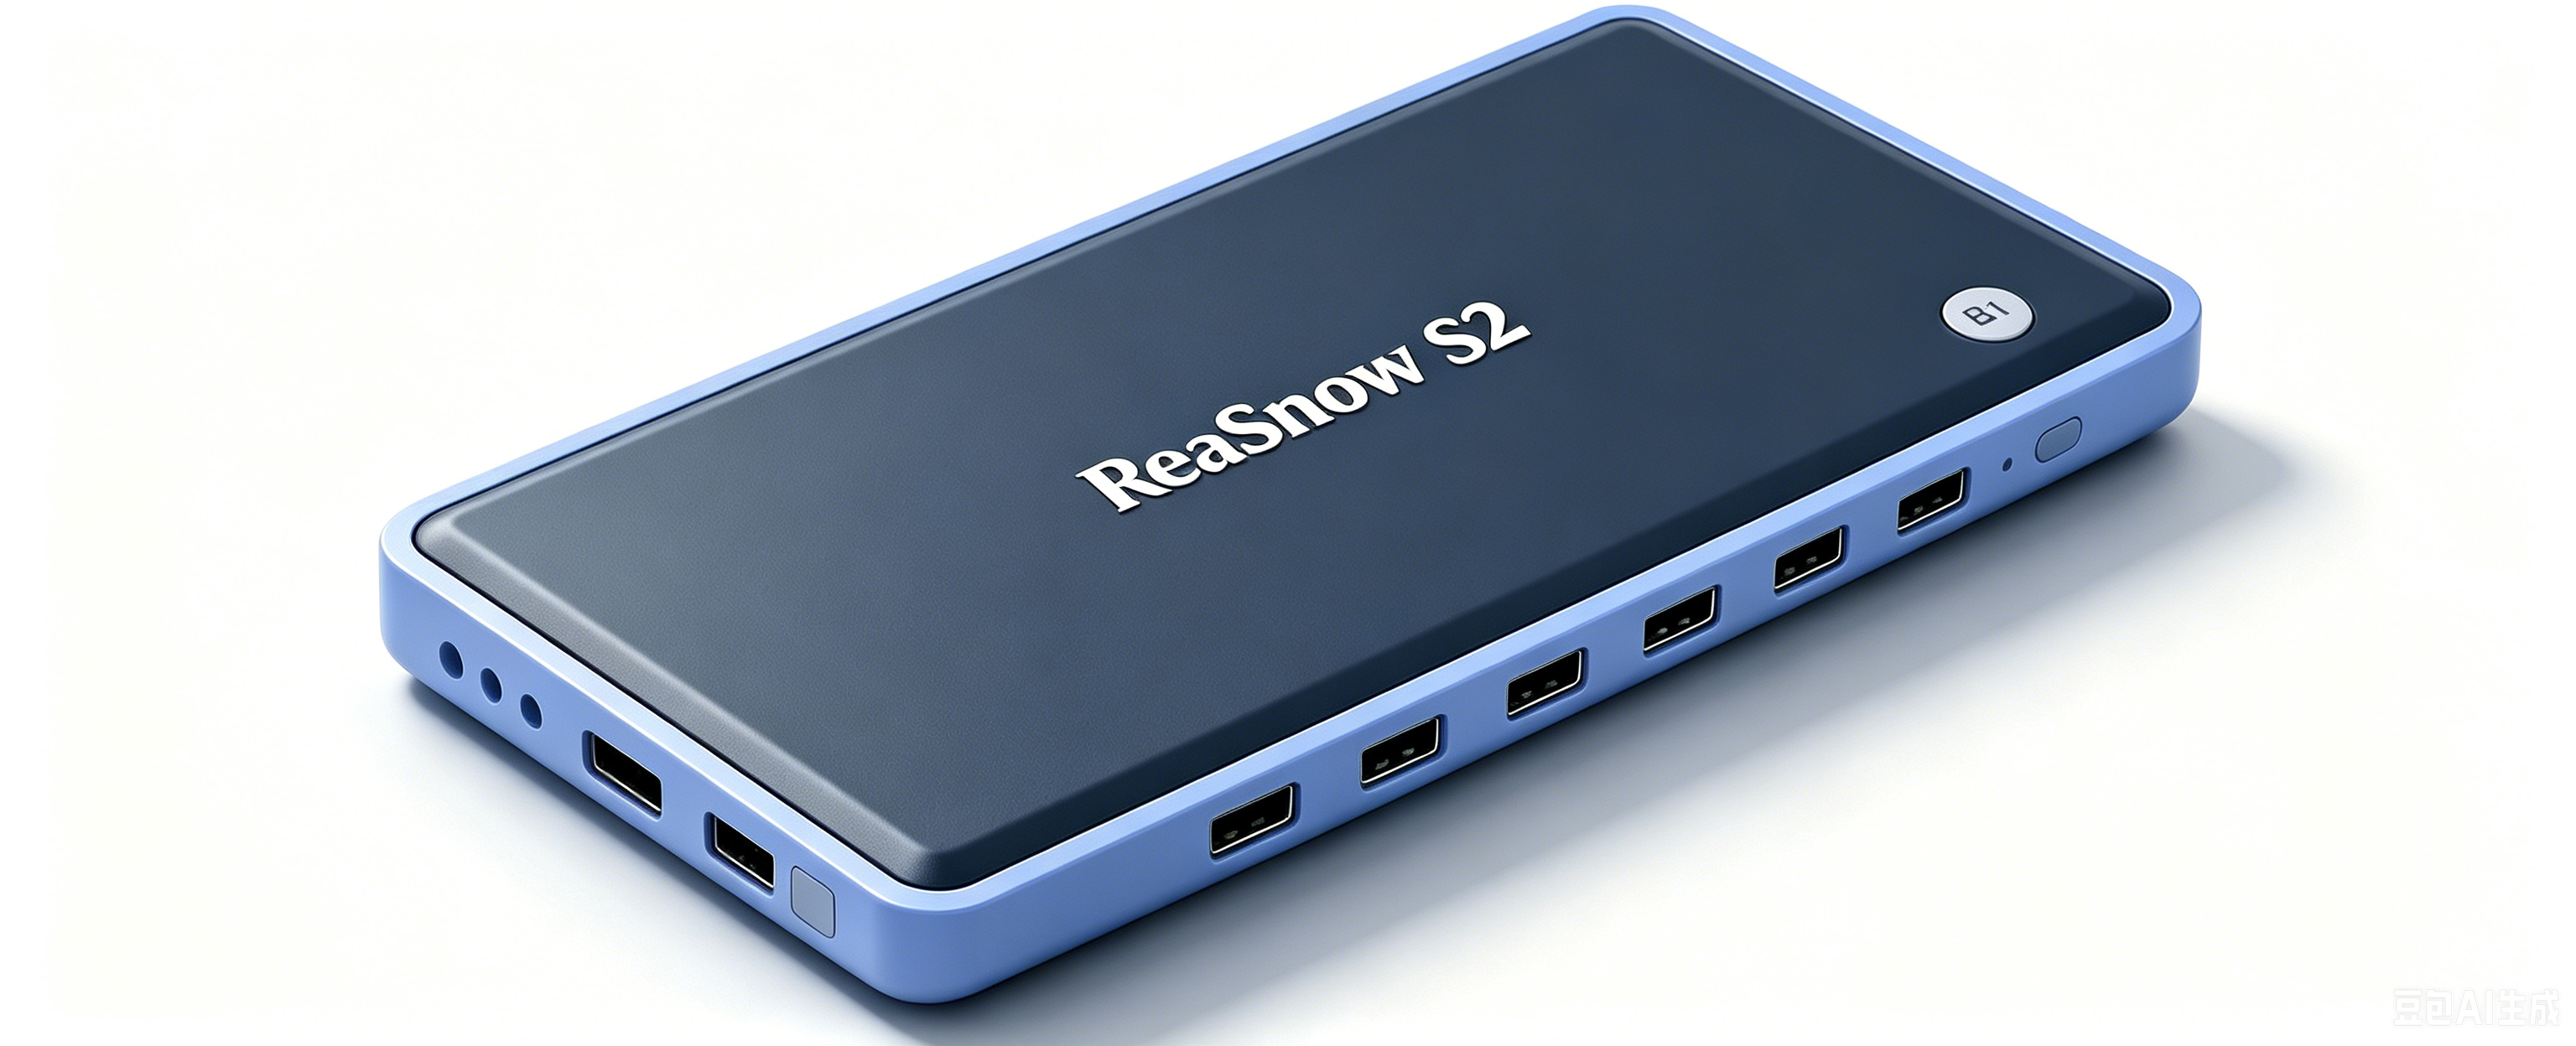
ReaSnow S2 is the 3rd-generation gaming converter from ReaSnow, built for competitive FPS players who demand precision, flexibility, and a mobile-first workflow.
It combines BLE mobile APP control, a 50-point Catmull-Rom curve editor, and a 6-port dual-output design into a single 120 × 60 × 24 mm device — no PC required at your gaming desk.
Key Features
| Feature | What It Does |
|---|
| Mobile APP Control | Full device control via ReaSnow Manager over BLE (Android/iOS). No USB tethering, no PC needed. |
| 6-Port Dual Output | 4× USB-A for peripherals + 2× USB-C for console output. Hook up keyboard, mouse, and controller simultaneously. |
| 50-Point Curve Editor | 50-point Catmull-Rom response curve with 5 presets and free-hand drag. Tune your aim down to the millimeter. |
| Real-Time IO Monitor | Watch 12 simultaneous inputs and analog values live on your phone. The fastest way to debug peripherals. |
| Macro System | 10 groups × 50 macros × 5 trigger modes with a visual timeline editor. Anti-recoil, bunny hop, fast build — all in one device. |
| 8-Digit Config Sharing | Share your full config (keybindings, curves, macros, sub-profiles) with an 8-digit code. Friends import it in seconds. |
| Creator Ecosystem | Publish configs, generate activation codes (3 days to 3 years), and monetize your setups. |
| PS5 Remote Play | LAN-based connection — no additional adapter required. |
| Cloud Backup | Save everything (Config + Engine + Macro + cover image) to the cloud. Move between devices without losing anything. |
| Platform | Status | Authentication |
|---|
| PS5 | ✅ | P5G (direct) / P5MATE adapter / Remote Play (LAN) |
| PS4 | ✅ | DS4 controller on USB1 |
| Xbox Series X|S | ✅ | XSX|XSS controller on USB1 |
| Xbox One | ✅ | XB1 controller on USB1 |
| Nintendo Switch 1/2 | ✅ | No auth device needed |
| PC (XB360 mode) | ✅ | No auth device needed — plug and play |
| PS3 | ❌ | — |
| Xbox 360 | ❌ | — |
S2 vs S1 — What’s New
| Dimension | S1 (2nd Gen) | S2 (3rd Gen) |
|---|
| USB Ports | 3× USB-A + 1× Micro USB | 4× USB-A + 2× USB-C |
| APP Platform | Android / iOS | Android / iOS |
| IO Monitor | — | ✅ Real-time 12-key + analog |
| Curve Editor | Basic | 50-point Catmull-Rom drag-editable |
| Macro Groups | — | 10 groups × 50 macros each |
| Config Sharing | Basic export/import | 8-digit share code + cloud |
| Creator System | — | ✅ publish configs + activation codes |
| Remote Play | — | ✅ PS5 LAN |
| Cloud Backup | — | ✅ |
| Config Slots | 16 | 16 |
| Keybinding Modes | Basic | dual modes |
| Report Rate | 125/250/500/1000 Hz selectable | 125/250/500/1000 Hz selectable |
| Steering Wheel | ✅ | ❌ |
Get Started
First-Time Setup Guide — 6 steps from unboxing to your first game.
1 - Getting Started
Everything you need to get your ReaSnow S2 up and running — wiring, APP setup, specifications, downloads, firmware updates, and Bluetooth pairing.
Start here if this is your first time using ReaSnow S2.
Ready for more? Head to Tuning & Configuration to dial in your aim, keybindings, and macros.
1.1 - Getting Started
First-time setup guide for ReaSnow S2, unbox, wire up, connect the APP, load a game config, and start playing in 3 steps.
This guide walks you through setting up your ReaSnow S2 for the first time. After these 3 steps, you will be in a game using your preferred mouse and keyboard.
What’s in the Box
- ReaSnow S2 device × 1
- USB-C cable × 1
- Quick Start leaflet × 1
Know Your Ports
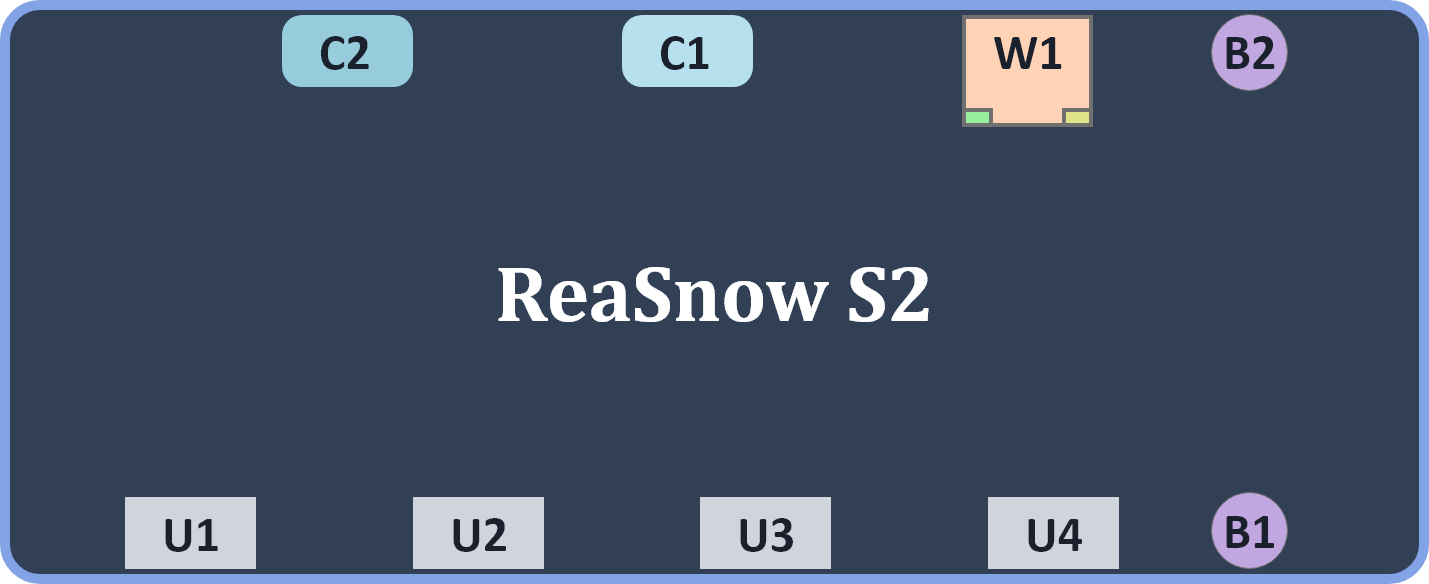
| Pin | Interface Type | Typical Use | Notes |
|---|
| U1 | USB-A | Authentication controller | Official controller for your console |
| U2 | USB-A | mouse,keyboard,controller,etc | input device |
| U3 | USB-A | mouse,keyboard,controller,etc | input device |
| U4 | USB-A | mouse,keyboard,controller,etc | input device |
| C1 | USB-C | Primary output | Main console / PC |
| C2 | USB-C | Secondary output | PC |
| W1 | RJ45 Ethernet | Remote Play dedicated network port | Low-latency wired LAN |
| B1 | Power Button | Power on/off | Long press to toggle |
| B2 | Firmware/Bluetooth Button | Press for BT pairing | Press for BT pairing; hold for firmware upgrade |
ℹ️ Info: S2 is powered over USB-C from the console or PC. No separate power adapter is needed.
Before You Begin
1. Prepare Your Mouse
Set your gaming mouse to the recommended range before connecting to S2:
- DPI: 4000–16000 (5000 dpi recommended)
- Report Rate: 250–1000 Hz (500 Hz recommended)
Use your mouse manufacturer’s software or the onboard DPI button to configure these settings.
| Platform | Action |
|---|
| PS4/PS5 | Settings → Accessories → Controllers → Communication Method → Use USB Cable |
| Switch | Settings → Controllers and Sensors → Pro Controller Wired Communication → ON |
| Xbox | No special settings required |
3. Install the APP
Download ReaSnow Manager on your phone:
- Android: Google Play (search “ReaSnow S2 Manager”), or download the APK from the Download Center
- iOS: App Store (search “ReaSnow S2 Manager”)
💡 Tip: Keep the APP updated to the latest version. The APP and S2 firmware are frequently updated together for compatibility.
Setup Steps
Step 1: Wiring Instructions
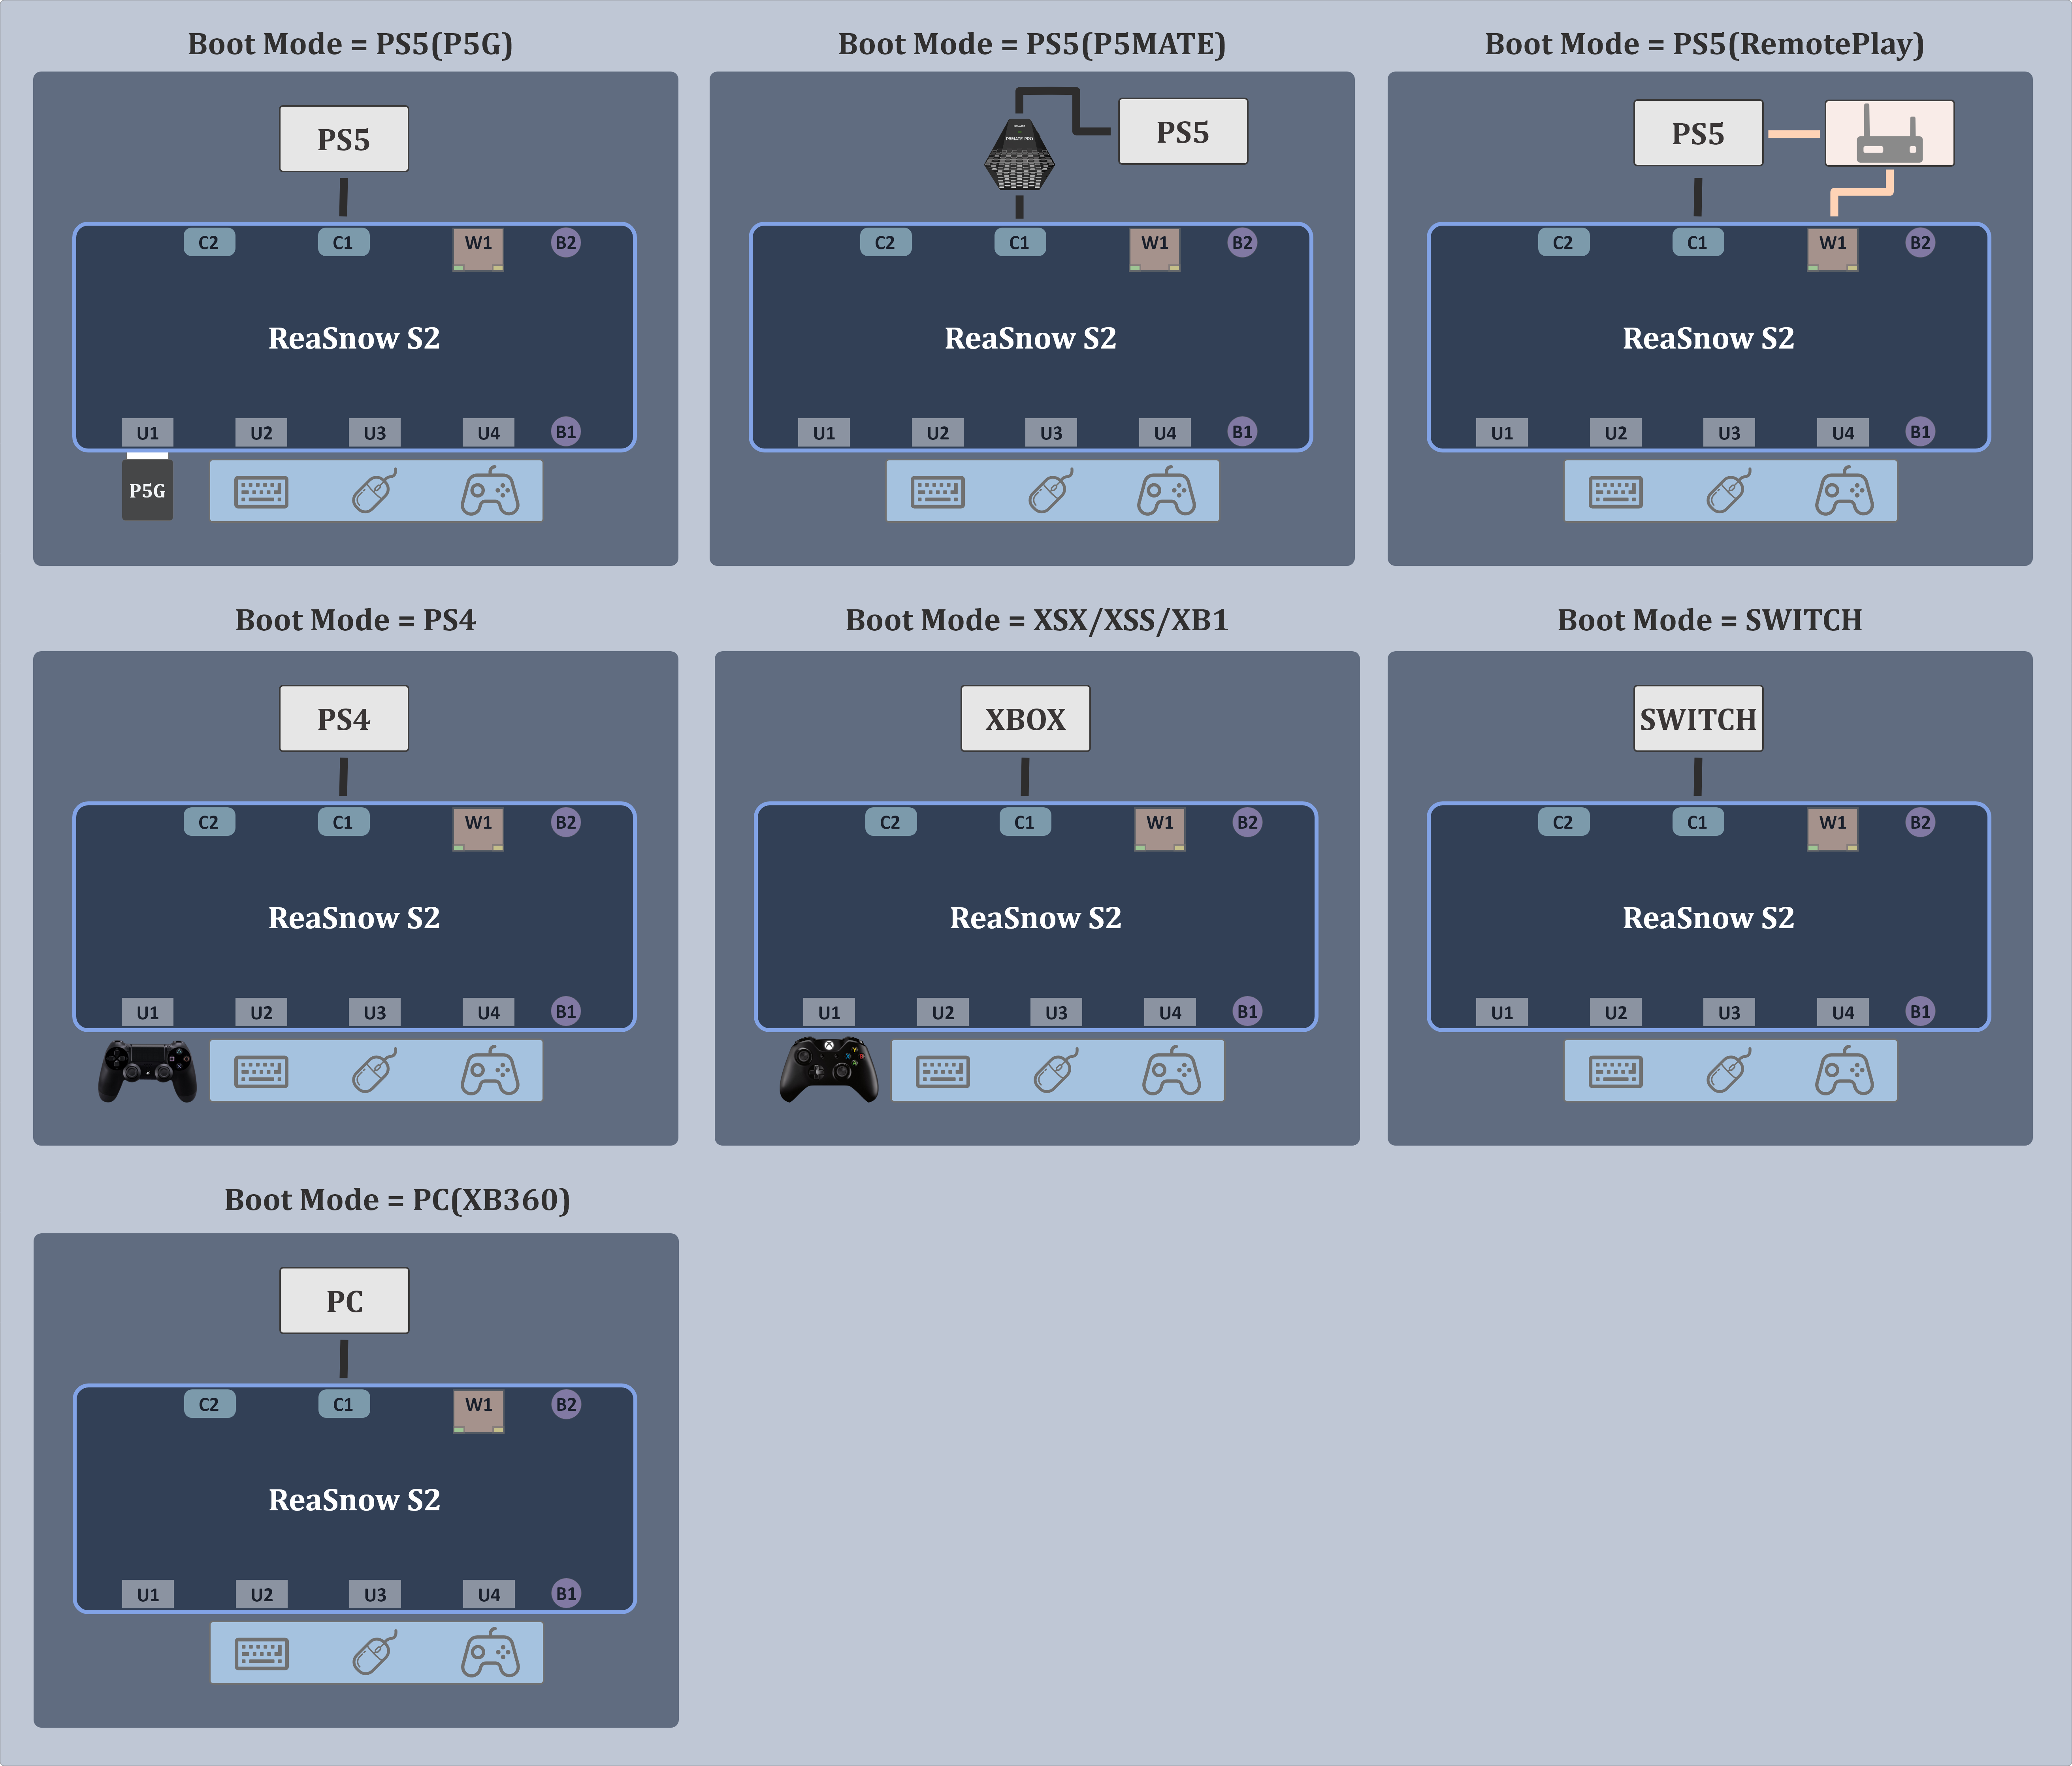
⚠️ Warning: Do not connect through an unpowered USB hub. Plug S2 directly into a console/PC USB port, or use a powered hub. Under-voltage causes authentication failures and disconnects.
Step 2: Connect the APP
- The LED of S2 will show green — it is waiting.
- Turn on Bluetooth and GPS on your phone.
- Open ReaSnow S2 Manager.
ℹ️ Info: Grant Bluetooth and Location permissions when asked, if this is the first connection.
ℹ️ Info: Upgrade to the latest firmware when notified.
ℹ️ Info: Choose the correct Boot Mode for your gaming platform.
ℹ️ Info: S2 stays paired. The next time you power on, the APP auto-reconnects.
Step 3: Add a Game Config & Play
- Switch to the Configs tab.
- Tap Official Configs to browse pre-made game configurations.
- Select a config and add it to your S2.
You are ready. The mouse and keyboard now translate to controller inputs with the selected game config.
- Press the activation hotkey to switch between configs mid-game.
- Use the IO Monitor page any time to verify that all buttons and sticks register correctly.
Firmware Note
Check the firmware version in the APP and upgrade to the latest before your first game session.
Detailed steps → Firmware Update
Keybinding
Familiarize yourself with the default key bindings and customize them to fit your playstyle.
Full guide → Keybinding
Mouse Tuning
Adjust in-game settings and mouse parameters according to your config recommendations.
Tuning guide → Aim Tuning
1.2 - Specifications
Complete hardware specifications and platform compatibility for ReaSnow S2, the 3rd-generation multi-platform gaming converter.
This page lists every hardware specification, supported platform, and compatibility limitation of ReaSnow S2.
Port Layout
| Pin | Interface Type | Typical Use | Notes |
|---|
| U1 | USB-A | Authentication controller | Official controller for your console |
| U2 | USB-A | mouse,keyboard,controller,etc | input device |
| U3 | USB-A | mouse,keyboard,controller,etc | input device |
| U4 | USB-A | mouse,keyboard,controller,etc | input device |
| C1 | USB-C | Primary output | Main console / PC |
| C2 | USB-C | Secondary output | PC |
| W1 | RJ45 Ethernet | Remote Play dedicated network port | Low-latency wired LAN |
| B1 | Power Button | Power on/off | Long press to toggle |
| B2 | Firmware/Bluetooth Button | Press for BT pairing | Press for BT pairing; hold for firmware upgrade |
Hardware Specifications
| Parameter | Value |
|---|
| Product Name | ReaSnow S2 |
| Generation | 3rd-Gen (S1 = 2nd, CrossHair = 1st) |
| Dimensions (L × W × H) | 120 × 60 × 24 mm |
| Weight | 95 g |
| Color | Black |
| USB-A Ports | 4 (U1–4 — connect peripherals: mouse, keyboard, controller, joystick) |
| USB-C Ports | 2 (C1/C2 — output to console/PC) |
| Ethernet | 1 (W1 — RJ45, dedicated for Remote Play) |
| Bluetooth | BLE (connect to ReaSnow Manager APP on mobile) |
| Button 1 | Firmware upgrade mode / Bluetooth pairing |
| Button 2 | Power switch |
| Config Slots | 16 (stored in built-in Flash) |
| Power | USB-C bus power (no external adapter needed) |
| Firmware Update | BLE OTA via APP |
| Operating Temperature | −10 ~ 50°C |
| Operating Humidity | ≤ 90% |
| Package Contents | S2 device ×1, USB-C cable ×1, Quick Start leaflet ×1 |
| Platform | Supported | Authentication Method | Notes |
|---|
| PS5 | ✅ | P5G (direct) / P5MATE (adapter) / Remote Play (LAN) | Three connection options |
| PS4 | ✅ | DS4 controller on USB1 | — |
| PS3 | ❌ | — | Not supported |
| Xbox Series X|S | ✅ | XSX|XSS controller on USB1 | — |
| Xbox One | ✅ | XB1 controller on USB1 | — |
| Xbox 360 | ❌ | — | Not supported |
| Nintendo Switch 1/2 | ✅ | No auth device required | Enable “Pro Controller Wired Communication” |
| PC (XB360 mode) | ✅ | No auth device required | Plug and play |
PS5 Connection Options
| Feature | P5G (Direct) | P5MATE (Adapter) | Remote Play (LAN) |
|---|
| Latency | Very low | Very low | Low |
| Vibration | — | ✅ | ✅ |
| Gyro | — | — | — |
| Adaptive Triggers | — | — | — |
| Controller Audio | — | — | — |
Unsupported Features
S2 is a keyboard and mouse converter. The following features are not supported and are marked for clarity:
| Feature | Status | Notes |
|---|
| Steering Wheel (Force Feedback) | ❌ | Including Expert Mode, Legacy Mode, clutch, H-shifter, sequential shifter, handbrake |
| Gyroscope (Gyro) | ❌ | — |
| Adaptive Triggers (PS5) | ❌ | — |
| PS5 Controller Audio Output | ❌ | Not available in P5G mode |
| Bluetooth Audio Devices | ❌ | No Bluetooth headphone support |
| USB Audio Devices | ❌ | No audio passthrough |
| Pedals (Racing) | ❌ | Part of steering wheel subsystem |
| PS3 | ❌ | Platform not supported |
| Xbox 360 | ❌ | Platform not supported |
Peripheral Compatibility Summary
| Category | Status | Details |
|---|
| Gaming Mice | ✅ | USB wired and 2.4 GHz wireless (via receiver). Recommended DPI: 4000–16000. Max report rate: 1000 Hz. |
| Gaming Keyboards | ✅ | USB wired. Recommended 6-Key Rollover minimum, NKRO preferred. |
| Official Controllers | ✅ | DS5, DS4, Xbox Series, Xbox One — used for authentication + input |
| Elite Controllers | ✅ | Xbox Elite, DualSense Edge — extra buttons may need additional setup |
| Third-Party Controllers | ✅ | Partial — refer to compatibility list |
| Flight Sticks (Joystick/HOTAS) | ✅ | Including stand-alone throttle |
| Arcade Sticks | ✅ | — |
| Steering Wheels | ❌ | No support |
| Bluetooth Mouse/Keyboard | ❌ | Direct BLE connection to S2 not supported — use USB or 2.4 GHz receiver |
Recommended Mouse Settings
| Setting | Recommendation |
|---|
| DPI | 4000–16000 |
| USB Report Rate | 250–1000 Hz |
| Acceleration | OFF |
⚙️ Advanced: Each Game Config calibrates the Intelligent Mouse Engine for its target game. Set your in-game settings to what the config recommends.
1.3 - APP Usages & Settings
Complete reference for ReaSnow Manager APP settings — global settings, IO monitor, hotkey selector, etc.
This page covers the Home, Configs, Settings and etc section of the ReaSnow Manager APP. For account management (login, registration, membership), see Account System.
APP Orientation
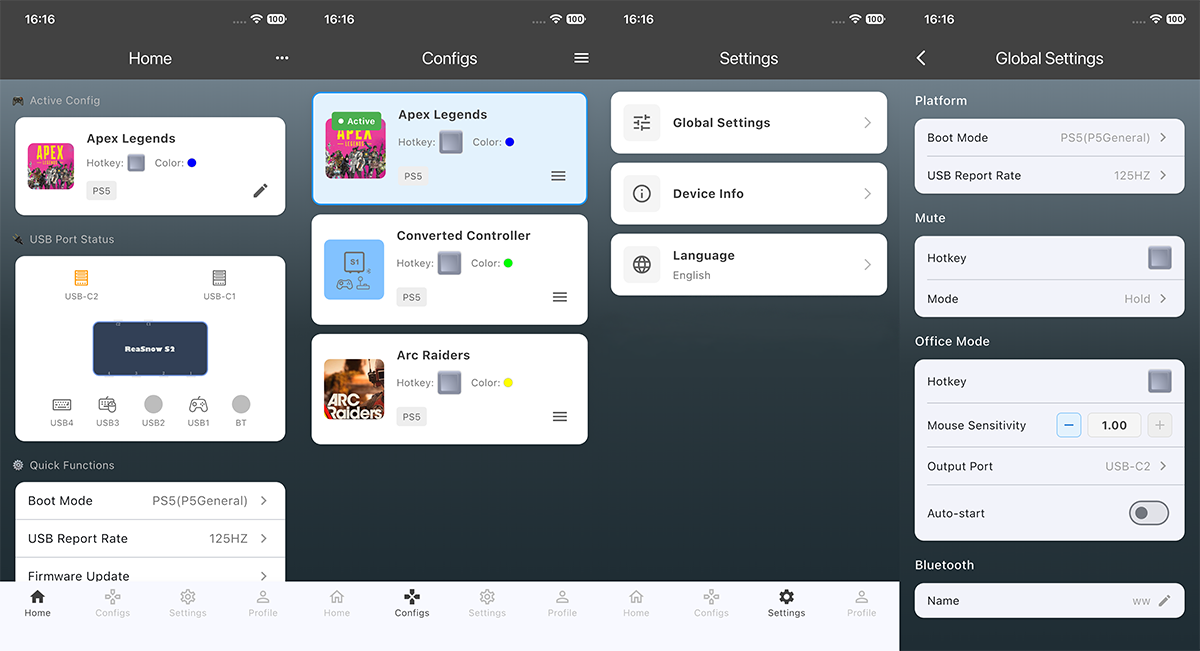
The main interface has 4 tabs at the bottom:
| Tab | Function |
|---|
| Home | Real-time dashboard: 6 port statuses, current active config, system state |
| Configs | Config slot manager, official config library, cloud backup |
| Settings | Global settings, device info, language selector |
| Profile | Account management, membership tier, creator center |
Open Settings from the bottom tab bar to access:
| Item | Description |
|---|
| Global Settings | Boot mode, USB report rate, mute mode, office mode, Bluetooth name |
| Device Info | Firmware version, hardware version, BLE protocol version, bootloader version, serial number, MAC address |
| Language | 8 languages: English, 日本語, 中文, Français, Deutsch, Русский, Português-BR, Español-MX |
Global Settings
Boot Mode
Sets which platform S2 emulates on boot. The correct mode must match your console and authentication method.
| Mode | Use For |
|---|
| PC (XB360) | PC in XB360 mode |
| PS5 (Remote Play) | PS5 over LAN via Remote Play |
| PS5 (P5MATE) | PS5 with P5MATE adapter |
| PS5 (P5General) | PS5 USB connection |
| PS4 | PS4/PS4 Pro |
| Xbox Series X|S | Xbox Series X|S |
| Xbox One | Xbox One |
| Nintendo Switch | Nintendo Switch 1/2 |
The selector shows all 8 modes as visual radio tiles. Tap a mode, confirm, and S2 automatically restarts into that mode.
USB Report Rate
| Option | Use Case |
|---|
| 125 Hz | Stability-oriented, legacy games |
| 250 Hz | Balanced |
| 500 Hz | Standard competitive |
| 1000 Hz | Lowest latency |
Higher report rates reduce input latency. Changing the rate causes S2 to restart automatically.
Mute Mode
Controls how the mute hotkey behaves:
| Mode | Behavior |
|---|
| Hold | Mute active while the hotkey is held down |
| Toggle | Press once to mute, press again to unmute |
Office Mode
When enabled, S2 outputs as a standard keyboard and mouse rather than a controller — useful for desktop tasks.
| Setting | Range / Default | Notes |
|---|
| Enable/Disable | OFF | Toggle |
| Mouse Sensitivity | 0.01–1.00 | Desktop tasks need lower sensitivity than gaming |
| Output Port | C1 / C2 | Which USB-C port to send output |
| Auto Start | ON / OFF | Launch office mode on power-up |
| Activation Hotkey | Configurable | Key combo to enter office mode |
Custom Bluetooth Name
Set a friendly name (up to 15 UTF-8 bytes) for S2’s BLE broadcast. Helps identify your device when multiple S2 units are nearby.
IO Monitor
The IO Monitor is a real-time input viewer — a unique S2 feature not found on competing converters.
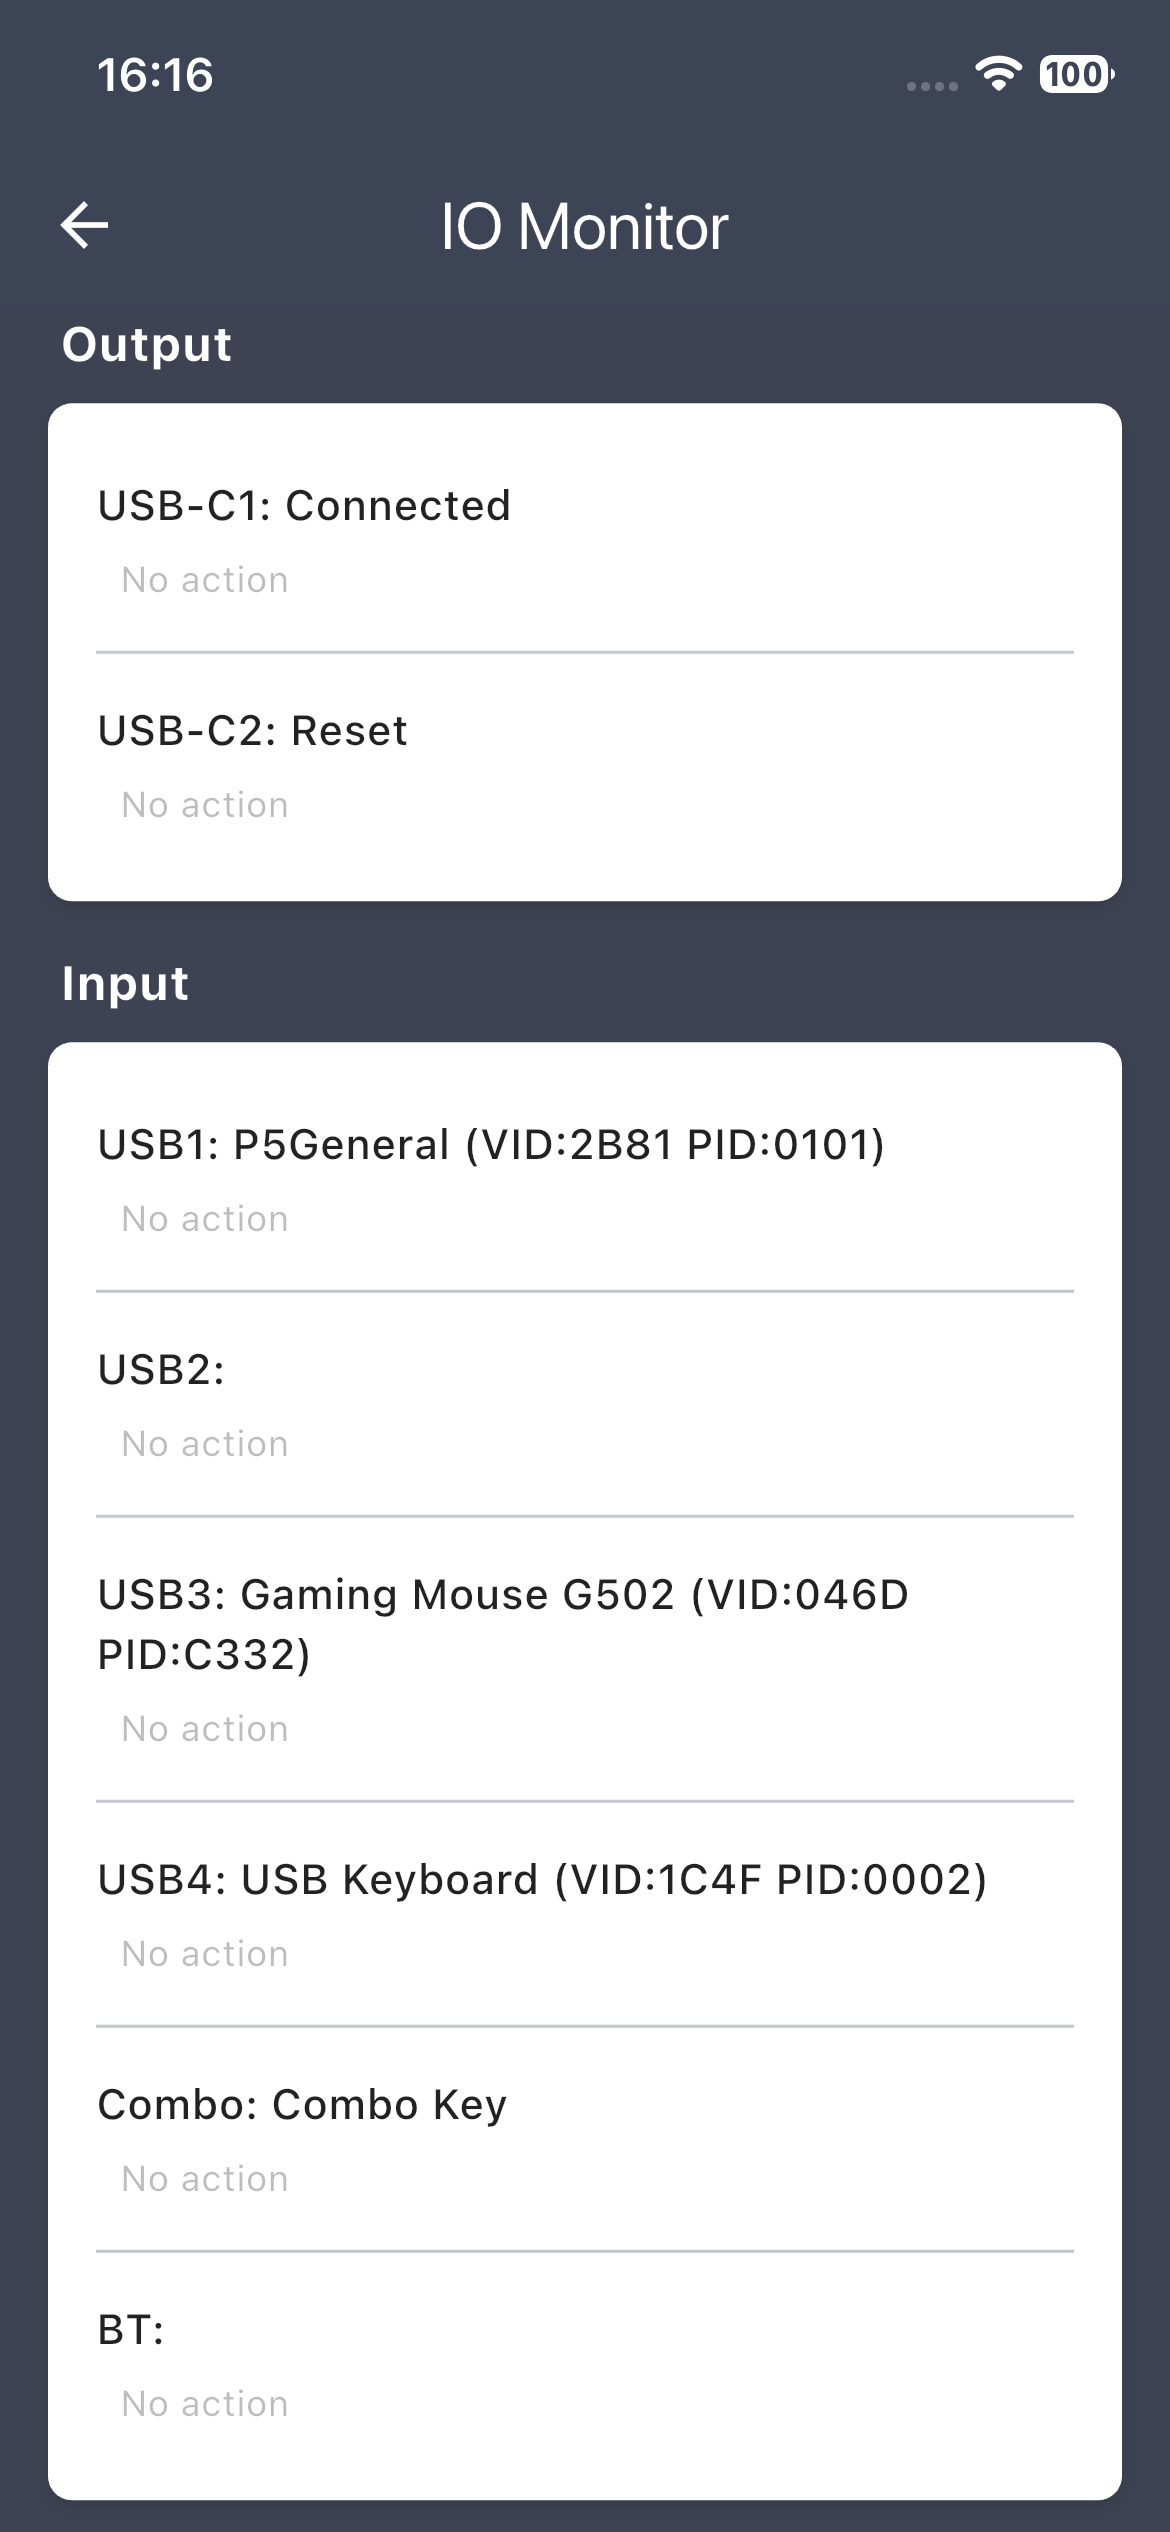
| Section | What It Shows |
|---|
| Port Status | USB1–4, Bluetooth — each port’s connected device name and input state |
| Key Presses | Up to 12 simultaneous keys with their mapped labels |
| Analog Values | Real-time X/Y stick values for both thumbsticks |
| System Info Panel | Currently loaded macro, active macro, system state, connected peripheral names |
💡 Tip: The IO Monitor is your best debugging tool. If a button isn’t working in-game, open this page and press it — you will immediately see whether S2 detects the input and what it maps to.
Hotkey Selector
Every action that can be bound to a key (config switching, macro activation, mute, office mode) uses the Hotkey Selector to assign the trigger.
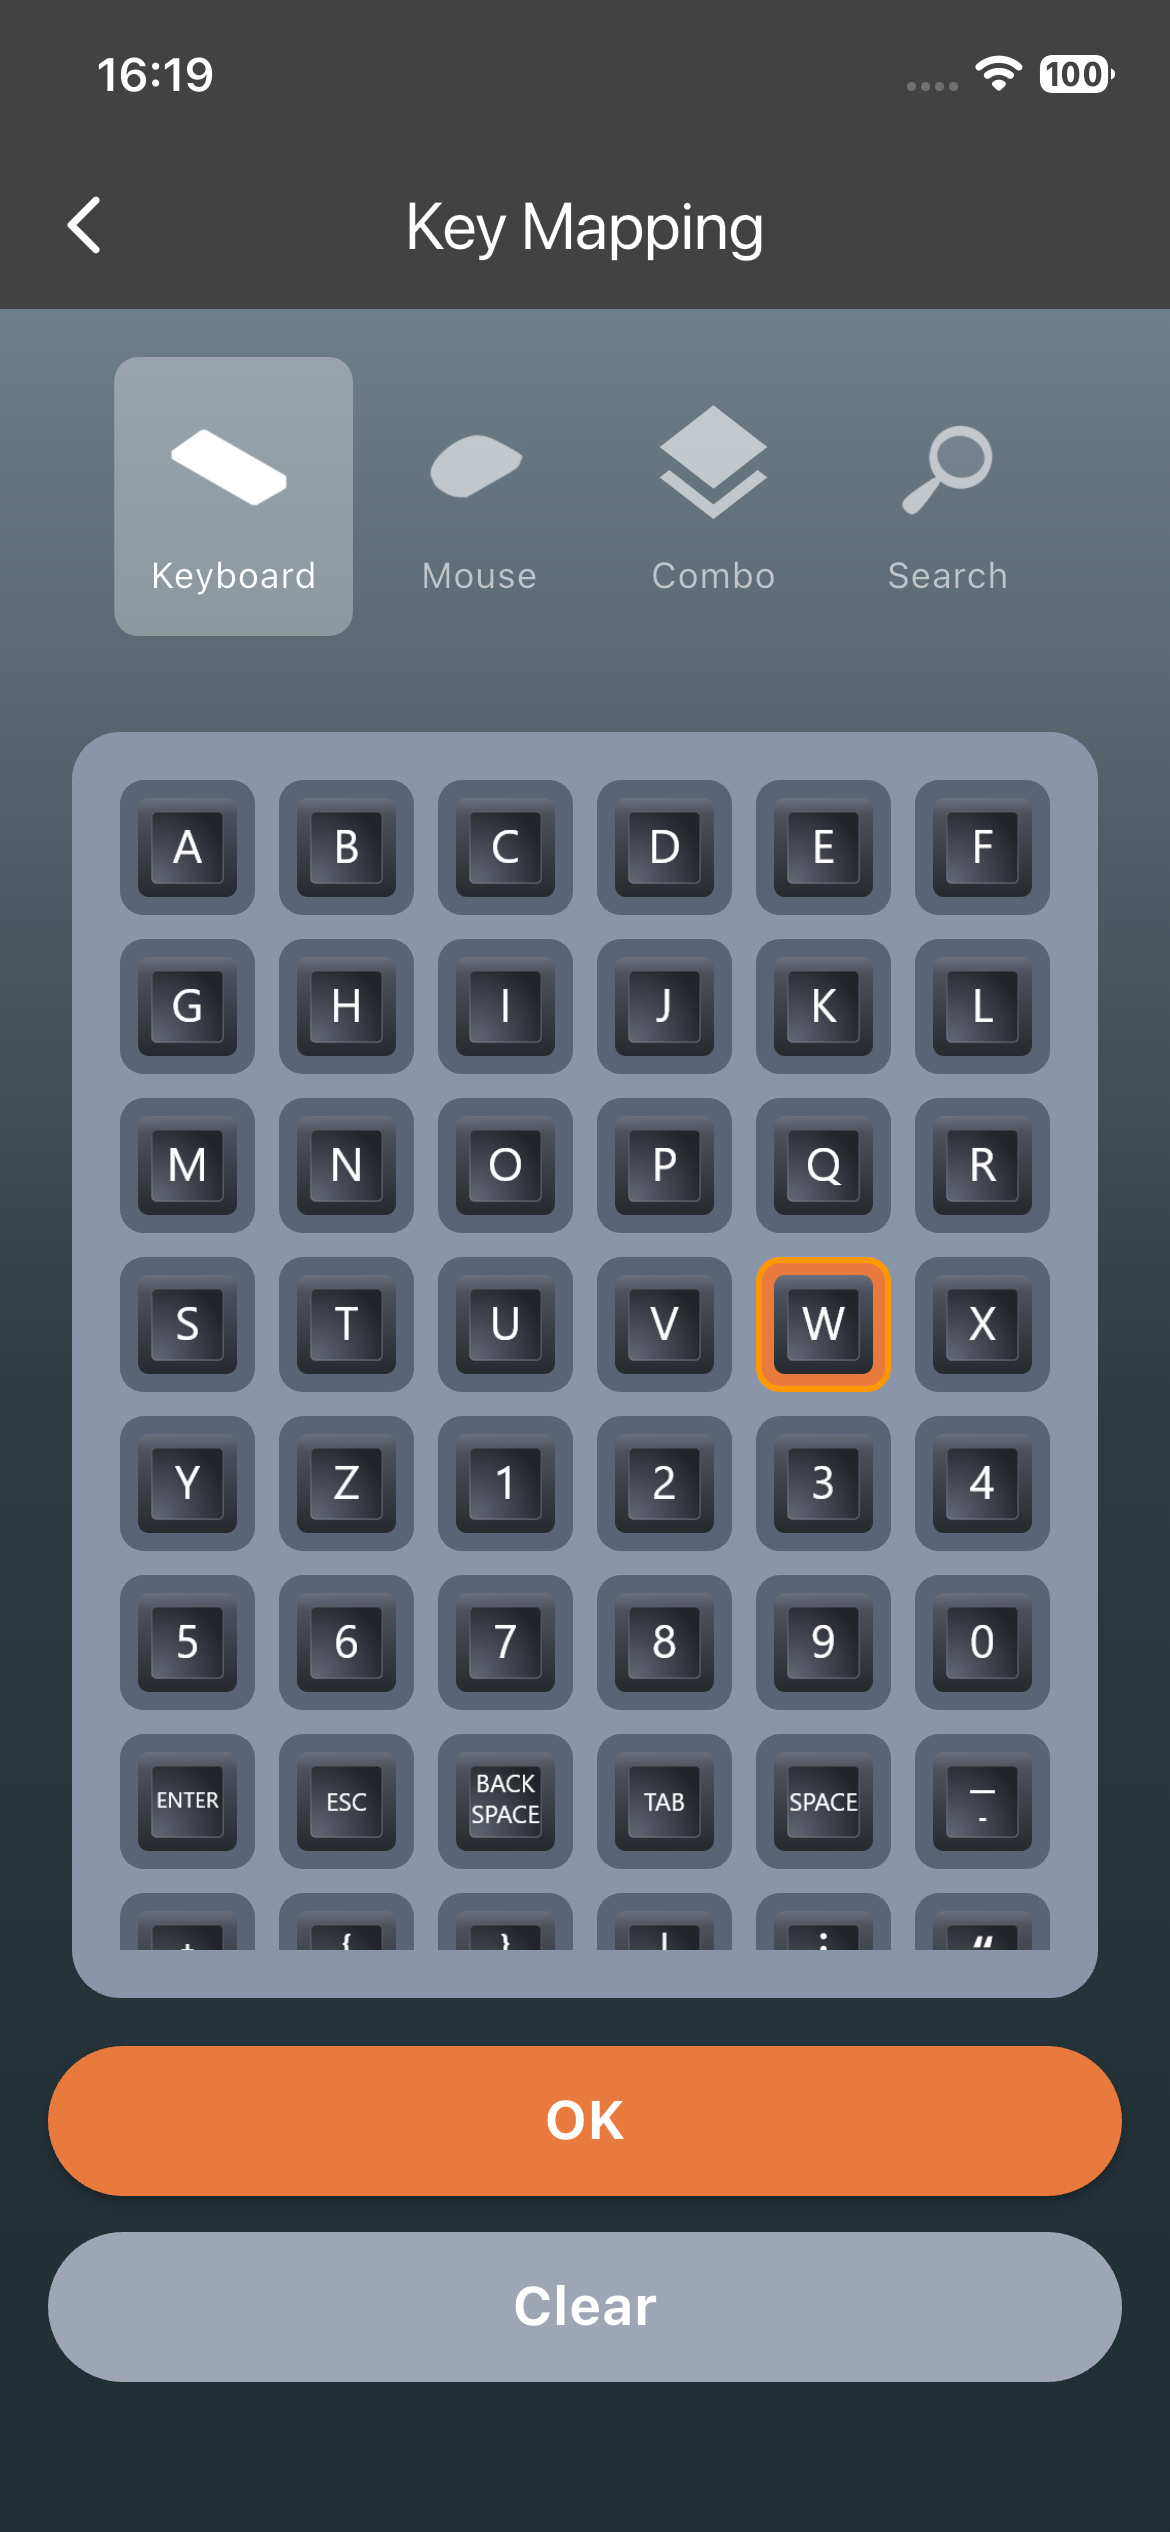
| Input Method | Description |
|---|
| Keyboard | Browse a visual grid of all keyboard keys with icons |
| Mouse | Left/Right/Middle/Side/Scroll Wheel/Mouse movements |
| Combo Keys | pre-defined combination keys |
| Search | Press the physical buttons on devices plugged into S2 — APP captures the key code in real time |
⚙️ Advanced — Search: Instead of picking from a grid, you press the actual key you want to use, and S2 learns it instantly. This is the fastest way to set a hotkey, especially for unusual keyboards.
1.4 - Bluetooth Pairing
How to pair your phone with ReaSnow S2 over BLE — first-time pairing, auto-reconnect, custom Bluetooth name, and troubleshooting.
S2 communicates with the ReaSnow Manager APP exclusively over Bluetooth Low Energy (BLE). There is no USB data connection between the APP and S2 — all configuration, firmware updates, and real-time monitoring happen wirelessly.
First-Time Pairing
- Power on S2 — the LED will show slow-flashing blue (waiting for BLE connection).
- On your phone, turn on Bluetooth and Location/GPS.
- Open the ReaSnow Manager APP.
- The APP automatically scans for nearby S2 devices — look for a device name starting with ReaSnow-S2- followed by a unique identifier.
- Tap your S2 in the device list to connect.
- The LED changes to solid blue when connected.
ℹ️ Info: Grant Bluetooth and Location permissions when asked. On Android, BLE scanning requires Location permission at the OS level — this is an Android requirement, not an S2 requirement.
Auto-Reconnect
S2 remembers the last paired phone. After the initial pairing:
- Power on S2 → the APP auto-reconnects within 5 seconds (if the APP is open and Bluetooth is on).
- If the BLE connection drops unexpectedly, the APP automatically attempts to reconnect.
- Upon reconnect, the APP resets to the Home tab.
Connection Rules
| Rule | Detail |
|---|
| One phone at a time | S2 accepts only one BLE connection. A second phone cannot connect while another is paired. |
| Range | Up to 10 meters in open air. For firmware updates, stay within 2 meters. |
| No USB tethering | APP-to-S2 communication is BLE only. The USB ports carry no data connection to the phone. |
Custom Bluetooth Name
Set a custom name for your S2’s BLE broadcast to make it easy to identify when multiple units are nearby:
- Go to Settings → Global Settings → Custom Bluetooth Name.
- Enter a name up to 15 bytes (UTF-8).
- Tap Save — the new name takes effect immediately.
Useful in tournament or LAN party settings where several players may have S2 devices in range.
Troubleshooting
| Symptom | Likely Cause | Solution |
|---|
| S2 not showing in device list | Bluetooth or Location is off | Turn on both Bluetooth and Location; grant permissions to the APP |
| S2 not showing in device list | S2 is already connected to another phone | Disconnect the other phone or power-cycle S2 |
| Connection drops frequently | Too far from S2 or BLE interference | Move closer; avoid dense wireless environments (Wi-Fi routers, other Bluetooth devices) |
| Connection drops during firmware update | Phone screen turned off or APP backgrounded | See Firmware Update for update rules |
| LED stays slow-flashing blue | Paired phone not in range or APP not open | Open the APP; check that Bluetooth is enabled |
💡 Tip: If nothing else works, restart your phone’s Bluetooth, power-cycle S2, and try again. This resolves most BLE pairing issues.
1.5 - Firmware Update
OTA firmware upgrade over BLE, version channels, and recovery on ReaSnow S2.
S2 firmware is updated wirelessly through the ReaSnow Manager APP — no PC, no USB cable, no file downloads required.
Update Channels
Choose a channel based on your needs:
| Channel | Description |
|---|
| Stable | Production-ready firmware. Recommended for all users. |
| Beta | Pre-release builds with new features. Minor issues possible. |
| Alpha | Development builds. For testing only — expect bugs. |
💡 Tip: Stay on the Stable channel unless you are testing a specific fix or feature with guidance from ReaSnow support.
How to Update
- Open the ReaSnow Manager APP and connect to S2.
- Navigate to Settings → Firmware Upgrade.
- The APP checks the server for available updates.
- If a newer version is available, tap Upgrade.
- The upgrade proceeds in four phases:
| Phase | Description |
|---|
| Version Check | APP compares local firmware version against the server manifest |
| Erase | S2 erases its old firmware partition |
| Download & Write | Firmware is sent over BLE. |
| Result Query | APP confirms the upgrade completed successfully |
During the Update
| What You See | What It Means |
|---|
| Progress percentage | Overall completion |
| Speed (KB/s) | Current BLE transfer rate |
| Estimated time remaining | Countdown to completion |
Important Notes
⚠️ Warning — follow these or the upgrade may fail:
| Rule | Reason |
|---|
| Keep the APP in the foreground | Backgrounded apps may be suspended by the OS |
| Do not let the phone screen turn off | Screen-off can interrupt the BLE connection |
| Disable battery saver / power-saving mode | Power saving throttles BLE throughput |
| Stay within 2 meters of S2 | BLE signal weakens with distance |
| Do not unplug S2 | Power loss during flashing can corrupt firmware |
Recovery
If an upgrade fails:
- The APP shows an error message with the failed phase.
- S2 remains in its current working state — a failed upgrade does not brick the device.
- Tap Retry to attempt the upgrade again.
- If repeated attempts fail, try:
- Moving closer to S2 (within 1 meter).
- Restarting the APP.
- Power-cycling S2.
- Switching to a different phone if BLE performance is consistently poor.
If the issue persists, contact ReaSnow support with your current firmware version and the error message.
1.6 - Download Center
ReaSnow S2 Manager APP downloads, firmware tools, and manuals.
Content coming in Round 3.
2 - Tuning & Configuration
Dive into aim tuning, keybinding, macros, and flight/arcade stick configuration for ReaSnow S2.
Customize every aspect of your S2 setup.
| Page | What You’ll Learn |
|---|
| Aim Tuning | DPI, report rate, sensitivity basics, 50-point curve editor, and deadzone setup |
| Keybinding | Map keyboard and mouse buttons to controller inputs, combo keys, SAB, and vibration |
| Macro System | 10 groups × 50 macros with visual timeline editor — anti-recoil, combos, automation |
| Flight & Arcade Stick | Joystick axis mapping and arcade stick setup. Steering wheels are not supported |
2.1 - Aim Tuning
Mouse sensitivity, DPI, report rate, curve editor overview, and controller dead zone settings for ReaSnow S2.
This section covers everything related to mouse aim tuning on S2 — from basic sensitivity setup to the 50-point curve editor and dead zone configuration.
Before You Tune
Get these fundamentals right first:
| Setting | Recommendation |
|---|
| Mouse DPI | 4000–16000 (5000 recommended) |
| Mouse Report Rate | 250–1000 Hz (500 Hz recommended) |
| Mouse Acceleration | OFF (disable in mouse software) |
| In-Game Sensitivity | MAX (let S2 handle the curve, not the game) |
Set your mouse to the recommended DPI and report rate using your mouse manufacturer’s software or onboard DPI button before connecting to S2.
Sensitivity Parameters
These are adjusted in the APP’s Mouse Advanced Settings page.
| Parameter | Range | Default | Description |
|---|
| HIP Sensitivity | 1–5000 | Per-config | Sensitivity when not aiming down sights (hip-fire) |
| ADS Sensitivity | 1–5000 | Same as HIP | Independent sensitivity when aiming down sights |
| Vertical Ratio | 10%–200% | 100% | Vertical sensitivity as a percentage of horizontal |
| Minimum Speed | 0–100 | 0 | Ignores mouse movement below this threshold — filters out micro-jitter |
⚙️ Advanced: HIP and ADS each have independent sensitivity values. This lets you keep fast turning while hip-firing and a slower, more precise speed when scoped in.
Response Curve
S2 uses a 50-point Catmull-Rom spline curve that maps physical mouse movement to in-game stick output. Each point is a control node you can drag to reshape the response.
Learn how to use the curve editor in detail: Curve Editor
Dead Zone
If your aim drifts when you are not touching the mouse, or the crosshair moves too abruptly from a standstill, adjust the dead zone. This is also where you fine-tune the controller stick dead zone for authentication and gameplay.
Full reference: Deadzone Settings
Aim Assist
S2 offers two aim-assist algorithms for games that benefit from stick-acceleration-style reticle friction:
| Option | Behavior |
|---|
| A | Standard assist curve |
| B | Alternate assist curve — try this if A feels too aggressive |
| Off | No aim assist applied |
⚠️ Warning: Aim assist behavior varies by game. Test both options in your game’s practice range before committing to one.
Saving Your Settings
All aim parameters are automatically synced to S2’s RAM as you adjust them. To make settings permanent across power cycles, tap Save to Flash — otherwise changes are lost when S2 powers off.
2.1.1 - Curve Editor
50-point Catmull-Rom curve editor with 5 presets, free-hand drag editing, and per-game curve recommendations for ReaSnow S2.
The curve editor maps your physical mouse movement to in-game stick output. A well-tuned curve makes aiming feel natural — the crosshair moves exactly where you expect it to.

How It Works
S2 samples your mouse movement and translates it through a Catmull-Rom spline curve with up to 50 control points. The X axis represents physical mouse speed; the Y axis represents the stick output sent to the console. Each point is an anchor you can drag to reshape the response.
5 Preset Curves
Start from a preset, then fine-tune. Tap any preset to load it onto the canvas.
| Preset | Shape | Best For |
|---|
| Linear | Straight diagonal line | Default — stick output scales 1:1 with mouse speed. Start here if unsure. |
| Slow Start | Shallow ramp, steepens later | Precision at low speed — ideal for sniping and long-range tracking |
| Fast Start | Steep initial ramp, flattens later | Quick flick turns, close-quarters combat |
| S-Curve | Gentle S-shape | Balanced — fast flick with a precision zone in the middle |
| Custom | Your own shape | Start from any preset, then drag points to create your own curve |

Editing Controls
| Action | How To |
|---|
| Drag a point | Touch and drag any control point on the canvas |
| Add a point | Tap an empty spot on the curve to insert a new control node |
| Reset a point | Double-tap a control point to snap it back to default |
| X/Y Axis Lock | Lock horizontal or vertical movement for fine adjustment of one axis |
| Swap X/Y | Mirror the curve across the diagonal — unused for most setups, available for edge cases |
Axis Options
For specialized scenarios, you can lock or swap the response axes:
| Option | Effect |
|---|
| X Lock | Vertical adjustment only — curve affects Y-axis output |
| Y Lock | Horizontal adjustment only — curve affects X-axis output |
| Swap X/Y | Exchange X and Y axes — the curve editor applies to the opposite axis |
💡 Tip: Most players leave both axes unlocked. Use axis locking only if you need different horizontal vs. vertical response — e.g., reducing vertical bounce during anti-recoil macros.
Per-Game Recommendations
Each official Game Config ships with a recommended curve tuned for that specific game. When you install a Game Config from the library, the curve is included automatically.
To see what curve the config recommends, open the curve editor after loading the config — the preset and point positions reflect the author’s tuning.
2.1.2 - Deadzone Settings
Stick dead zone and trigger threshold configuration for ReaSnow S2 — per-game differences, inner/outer dead zone, and precise numeric input.
Dead zones define how much physical movement is ignored before S2 begins outputting a stick or trigger signal. Properly tuned dead zones eliminate drift, reduce unwanted movement, and make stick response feel consistent across different controllers.
Controller Stick Dead Zone
Two controllers can have their dead zones configured: the authentication controller (plugged into USB1) and the main controller (USB2–4).
| Parameter | Range | Description |
|---|
| Inner Dead Zone | 0–100 | Movement below this threshold is ignored. Higher = more stick movement required before output starts. |
| Outer Dead Zone | 0–100 | The maximum position before the stick is considered fully tilted. Lower = reaches 100% output sooner. |
Authentication vs. Main Controller
| Controller | USB Port | When to Adjust |
|---|
| Guide (Auth) | USB1 | If the authentication controller’s stick is visibly drifting on the IO Monitor |
| Main | USB2–4 | If your gameplay controller’s stick feels too sensitive or not responsive enough at the edges |
Trigger Dead Zone
Configure the inner and outer dead zone for analog triggers (L2/R2) on connected controllers.
| Parameter | Range | Description |
|---|
| Trigger Inner Dead Zone | 0–100 | How far you must pull the trigger before output begins |
| Trigger Outer Dead Zone | 0–100 | How far before the trigger reaches 100% output |
Trigger dead zones are useful for games where you want a hair-trigger response (lower inner dead zone) or need to prevent accidental trigger activation (higher inner dead zone).
Every dead zone slider supports precise numeric entry. Tap the value to open an input box and type the exact number you want — no need to guess with the slider.
Dead Zone Shape
For the main controller sticks, choose between two dead zone shapes in the Game Settings page (alongside keybinding configuration):
| Shape | Behavior |
|---|
| Circle | Equal dead zone in all directions. Best for most games. |
| Rectangle | Independent X and Y thresholds. Useful for games with strong horizontal-vertical aim asymmetry. |
💡 Tip: Start with Circle and a low inner dead zone (5–10). Increase only if you notice stick drift on the IO Monitor.
Per-Game Differences
Different games interpret stick input differently. A dead zone that works for one FPS may cause sluggish aim in another. Always test after changing:
- Open the IO Monitor to see real-time stick values.
- Move the stick to the edges — verify both X and Y reach 100%.
- Release the stick — verify both axes return to 0.
- Adjust the inner dead zone up if values do not settle at 0, or adjust the outer dead zone down if values do not reach 100%.
⚠️ Warning: Setting the inner dead zone too high can create a “jump” when the stick passes the threshold. Keep the inner dead zone as low as your hardware allows.
2.2 - Macro System
Macro recording, editing, and group management on ReaSnow S2 — 10 groups, 50 macros each, visual timeline editor, anti-recoil, and 7 real-world scenarios.
S2’s macro system lets you record and play back sequences of button presses with millisecond precision. Use it for anti-recoil patterns, movement combos, rapid building, and any repeated input sequence.
Macro Structure
| Level | Capacity | Description |
|---|
| Macro Groups | 10 | Each group is a container with its own activation hotkeys and trigger behavior |
| Macros per Group | 50 | Each macro is a sequence of timed button events |
| Steps per Macro | Unlimited | Limited only by S2’s internal Flash capacity |
Think of a group as a “loadout” for one game or playstyle. Switch between groups to change your entire macro setup.
Group Settings
Each macro group has independent settings:
| Setting | Options | Description |
|---|
| Activation Hotkeys | 4 per group | Key combos that activate macros within this group |
| Trigger Mode | Hold / Toggle / Press / Release / Double Press | How the activation hotkey triggers the macro |
| Execution Mode | Single / Parallel / Loop | Whether macros run one-at-a-time, simultaneously, or on repeat |
Trigger Modes
| Mode | Behavior |
|---|
| Hold | Macro runs while the hotkey is held down; stops on release |
| Toggle | Press once to start, press again to stop |
| Press | Fires once on key-down, runs to completion |
| Release | Fires once on key-up |
| Double Press | Fires when the key is pressed twice quickly |
Execution Modes
| Mode | Behavior |
|---|
| Single | One macro runs at a time. Pressing a new hotkey stops the current macro. |
| Parallel | Multiple macros can run simultaneously. Useful for combining anti-recoil + movement. |
| Loop | The macro repeats continuously while the hotkey is held. Stops on release. |
Macro Editor
The visual timeline editor is the core of macro creation. Each row is a time step; each column is an action.

| Parameter | Options | Description |
|---|
| Name | Up to 20 bytes | Macro display name |
| Type | Common / Anti Recoil | Anti-recoil macros auto-activate in ADS scenarios |
| Scope | All / HIP / ADS / HIP+ADS | When the macro is allowed to run |
| Term Mode | Immediately / Until Last Line | Immediately = stop instantly on hotkey release; Until Last Line = finish current loop iteration |
| Timeline | Visual drag editor | Add keyboard, mouse, and controller actions — each with its own duration |
💡 Tip: Use the Play Test button to preview the macro in the editor before saving it to S2. The IO Monitor shows exactly what the macro outputs.
Anti-Recoil Macros
Anti-recoil macros are specialized macros that compensate for vertical weapon kick during ADS:
| Feature | Description |
|---|
| Type: Anti Recoil | Marks the macro as a recoil-control sequence |
| Scope: ADS | Only activates when aiming down sights |
| Automatic Activation | Fires automatically on ADS — no separate hotkey needed |
Create a short sequence of downward stick movements timed to your weapon’s fire rate. The macro editor’s ms-level precision lets you match the recoil pattern exactly.
Macro Element Selector
When adding actions to the timeline, choose from three input categories:
| Category | Examples |
|---|
| Keyboard | Any key — WASD, numbers, function keys |
| Mouse | Left/Right/Middle click, side buttons, scroll wheel, DPI button |
| Controller | Face buttons, D-pad, bumpers, triggers, stick clicks |
7 Scenario Examples
These real-world examples show what the macro system can do:
| # | Scenario | What It Does | Trigger Mode |
|---|
| 1 | Recoil Control | Downward stick nudges timed to weapon fire rate — compensates vertical recoil | Hold (ADS) |
| 2 | Bunny Hop | Repeated jump inputs at a fixed interval for sustained movement speed | Hold |
| 3 | Fast Build | Sequence of build-mode button presses — wall, ramp, floor in one key | Press |
| 4 | Crouch Shot | Crouch → fire → stand — strafes while ducking in and out of cover | Toggle |
| 5 | Touchpad Action | Simulates PS4/PS5 touchpad press for games that use it as a map or menu button | Press |
| 6 | Auto Loot | Rapid interact button presses to vacuum up loot in battle royale games | Hold |
| 7 | Combo Chain | Multi-step combo of attacks or abilities chained with precise timing | Press |
Recording a Macro
- Open the macro editor for the target macro slot.
- Tap the Record button.
- Press keys and buttons on your connected devices — S2 captures timing and order.
- Tap Stop to finish.
- Use the timeline editor to adjust timing, add delays, or insert new actions.
- Tap Play Test to preview.
- Save to Flash to persist to S2.
⚠️ Warning: Macros are saved to RAM automatically as you edit. Tap Save to Flash before powering off S2, or your changes will be lost.
2.3 - Keybinding
Button mapping, combo keys, SAB analog stick, and vibration settings on ReaSnow S2 — full mapping entries, 4 modes, 40 combo slots.
Keybinding translates your keyboard and mouse inputs into controller outputs. Each mapping tells S2: “when this key is pressed, send that controller button to the console.”
Config Structure
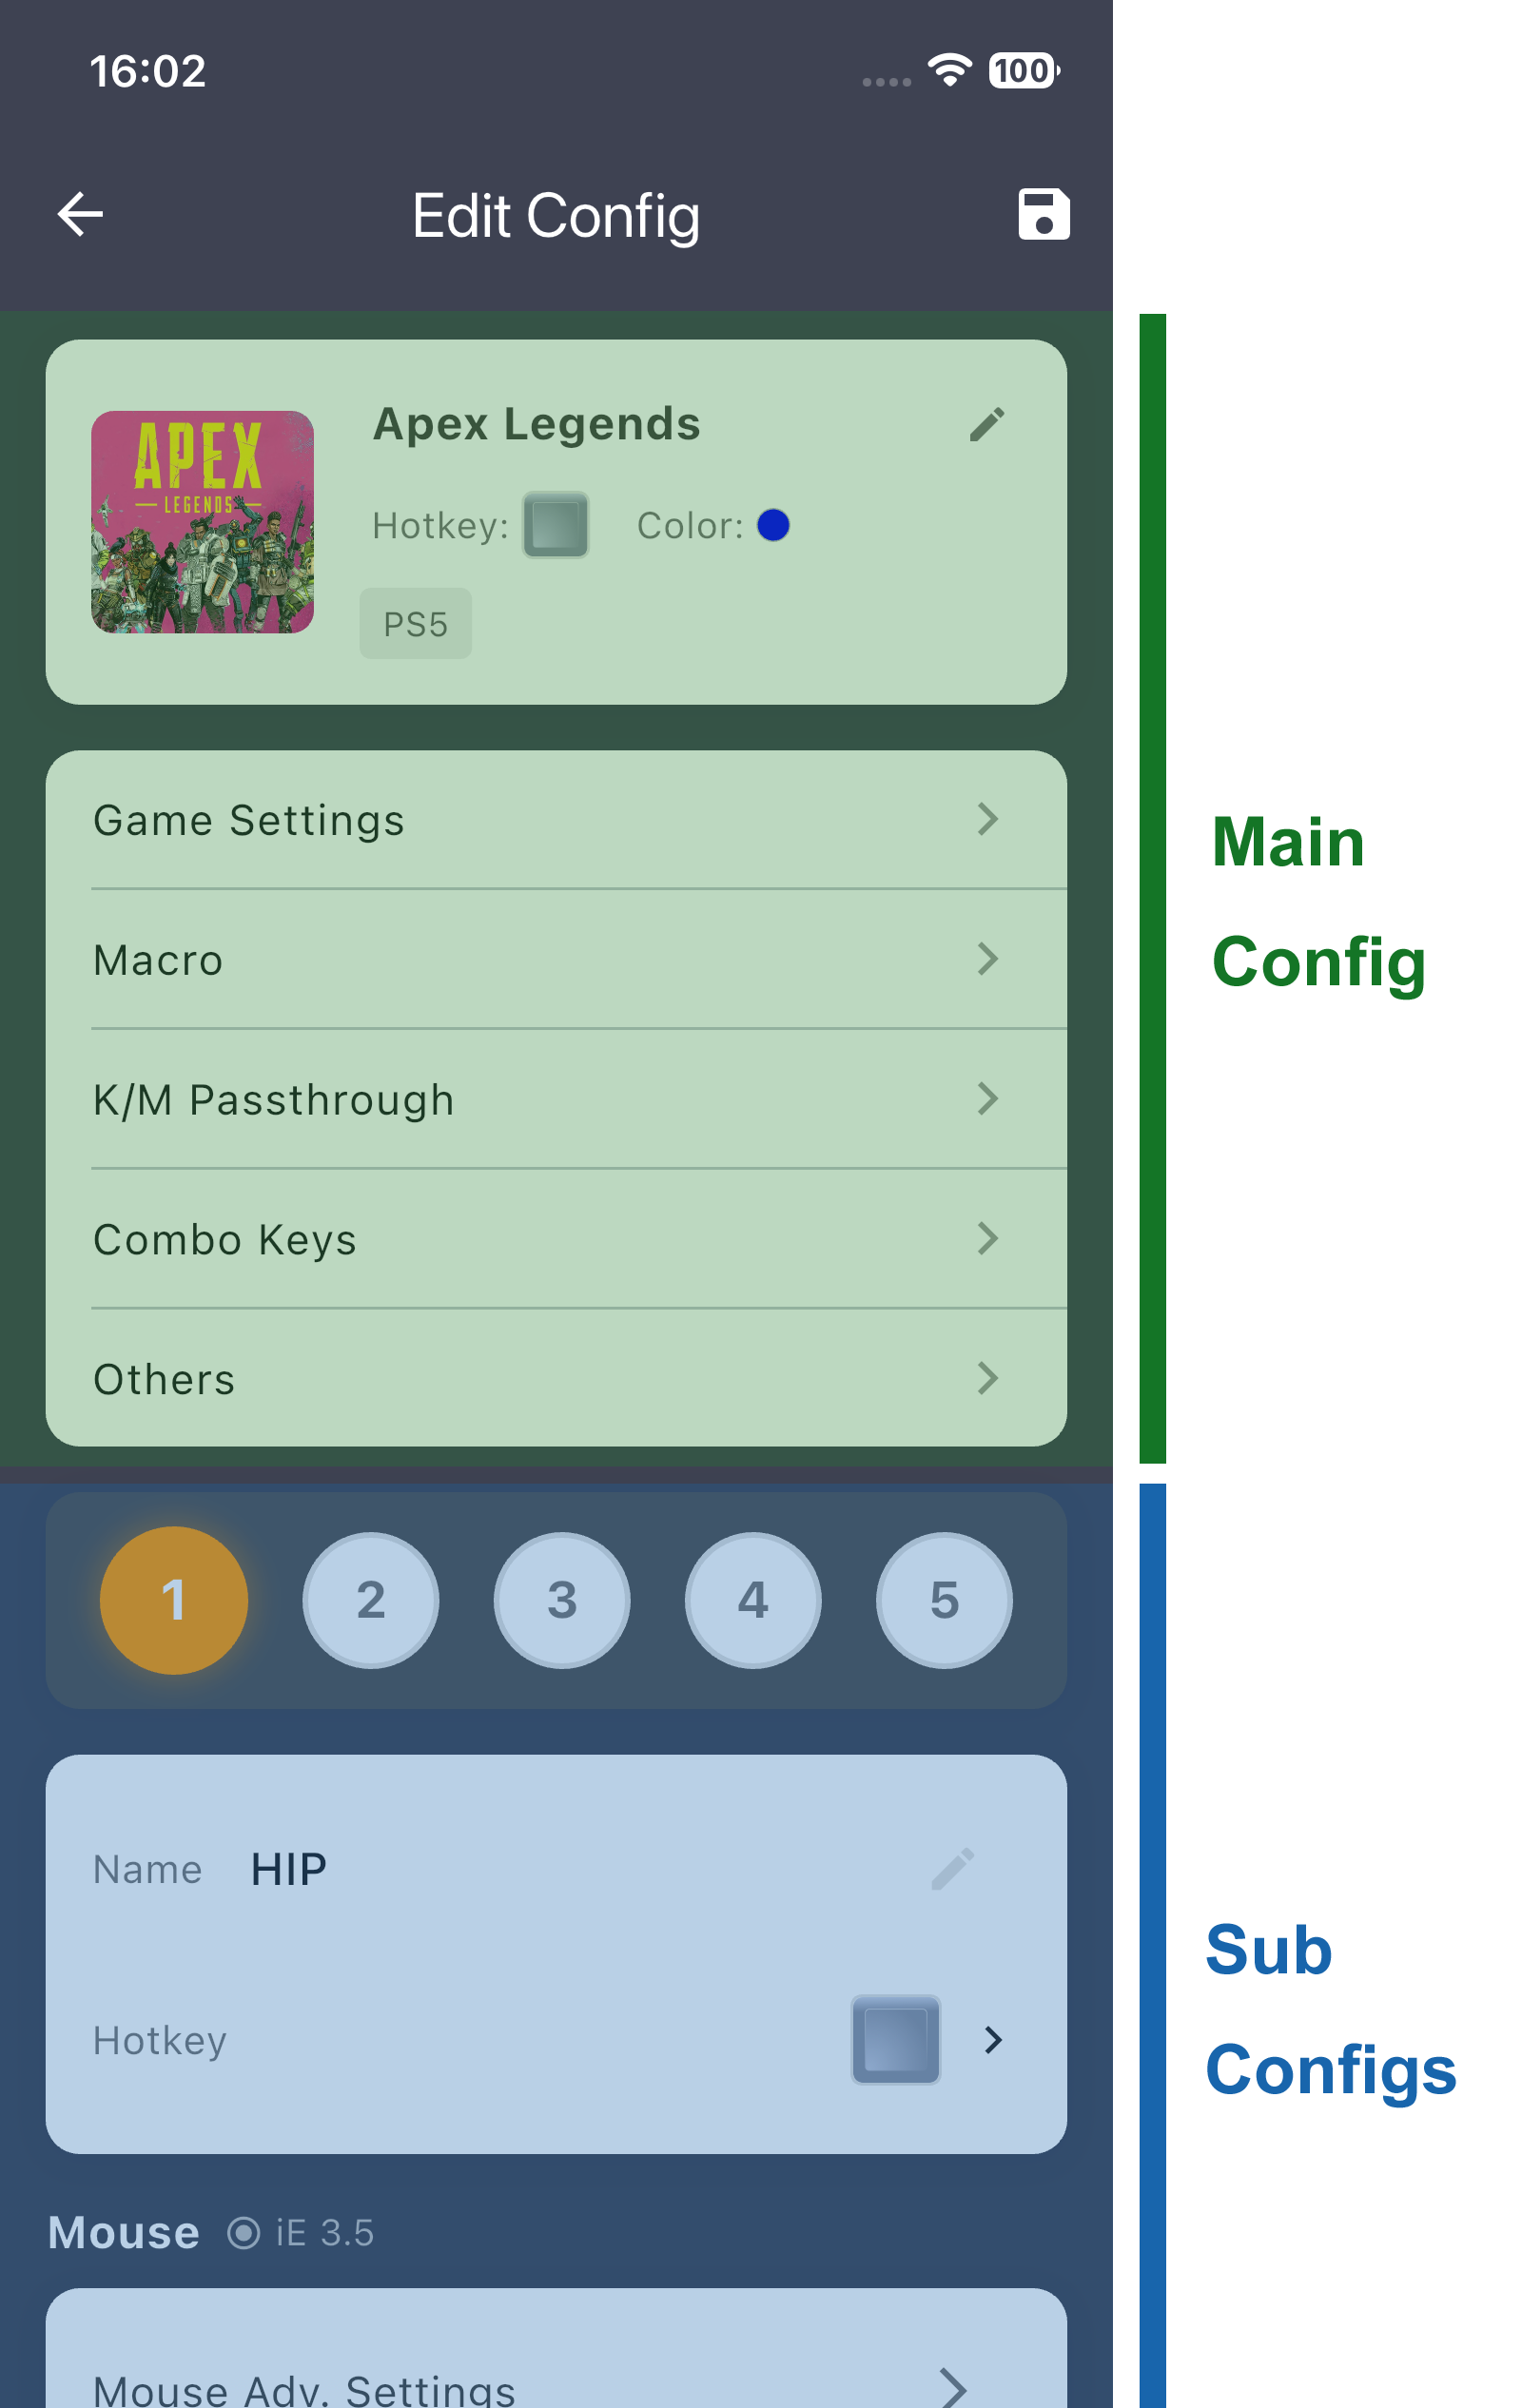
| Element | Capacity | Description |
|---|
| Main Config | 1 | The primary configuration — game name, platform, activation hotkey, etc |
| Sub Configs | 5 (HIP / ADS / TBD1 / TBD2 / TBD3) | Context-specific overrides — e.g., different mappings for hip-fire vs. ADS |
Sub configs let you switch mapping layouts by context. For example, a sniper button that changes scope while ADS uses one mapping in the HIP config and a different one in the ADS config.
Sub Config Inheritance
Sub configs 2–5 can inherit mappings from the HIP config:
- ADS inherits from HIP
- TBD1 inherits from HIP
- TBD2 inherits from HIP
- TBD3 inherits from HIP
Inheritance means you use the same mappings.
| Mode | Behavior |
|---|
| Disabled | This sub config has its own independent mappings |
| Enabled | This sub config use the same mappings just as the HIP config |
Keybinding List
The mapping list shows all slots with their default keys and target outputs:
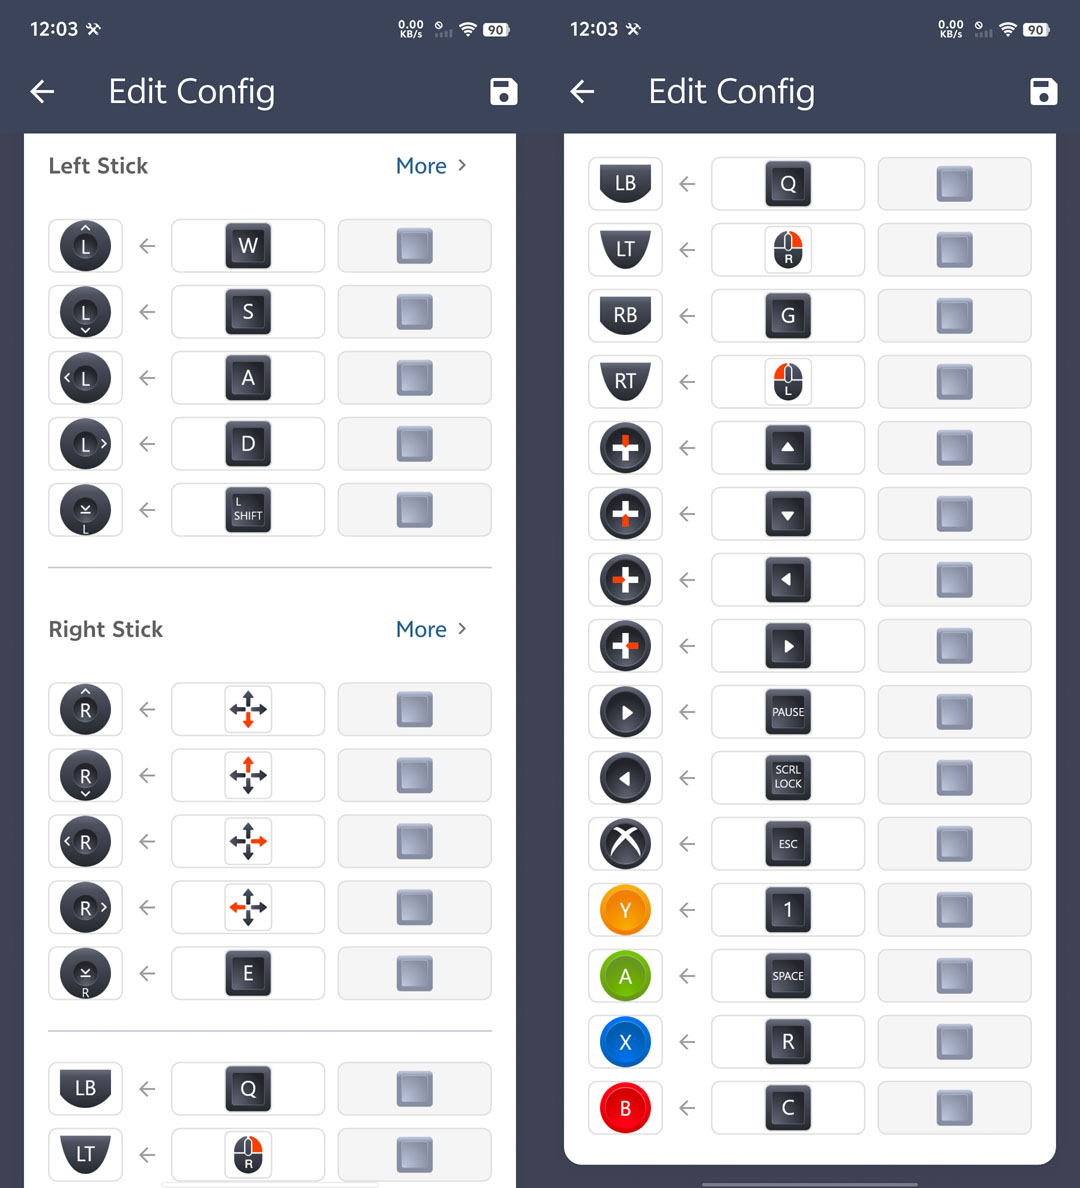
Mapping Methods
| Input Method | Description |
|---|
| Keyboard | Browse a visual grid of all keyboard keys with icons |
| Mouse | Left/Right/Middle/Side/Scroll Wheel/Mouse movements |
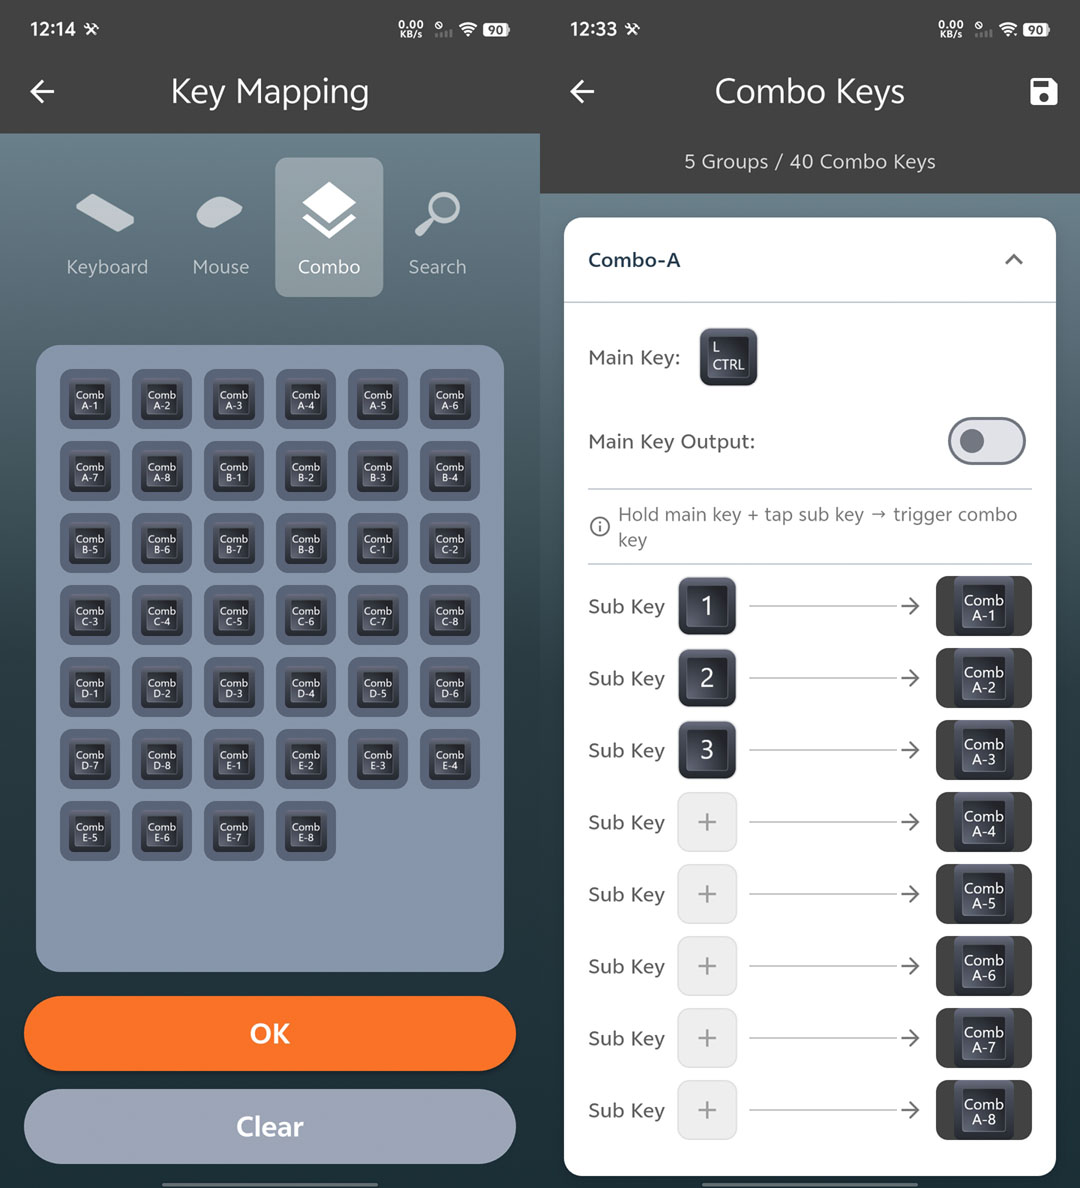
| Combo Keys | pre-defined combination keys |
| Search | Press the physical buttons on devices plugged into S2 — APP captures the key code in real time |
⚙️ Advanced — Search: Instead of picking from a grid, you press the actual key you want to use, and S2 learns it instantly. This is the fastest way to set a hotkey, especially for unusual keyboards.
Combo Keys
A combo combines two input keys (from keyboard, mouse, controller, or any compatible device) into a single virtual key,
which is then mapped to a controller button output or used to activate a feature.
| Parameter | Value |
|---|
| Combo Groups | 5 |
| Slots per Group | 8 |
| Max Combos | 40 |
Each combo group holds 8 combo entries. Press the two assigned input keys simultaneously to trigger the virtual key,
useful for actions that benefit from two-handed input or to create unique shortcuts that avoid normal-key conflicts.
💡 Tip: Combo Keys should be set properly in the “Combo Keys” page before its usage
Analog Behavior
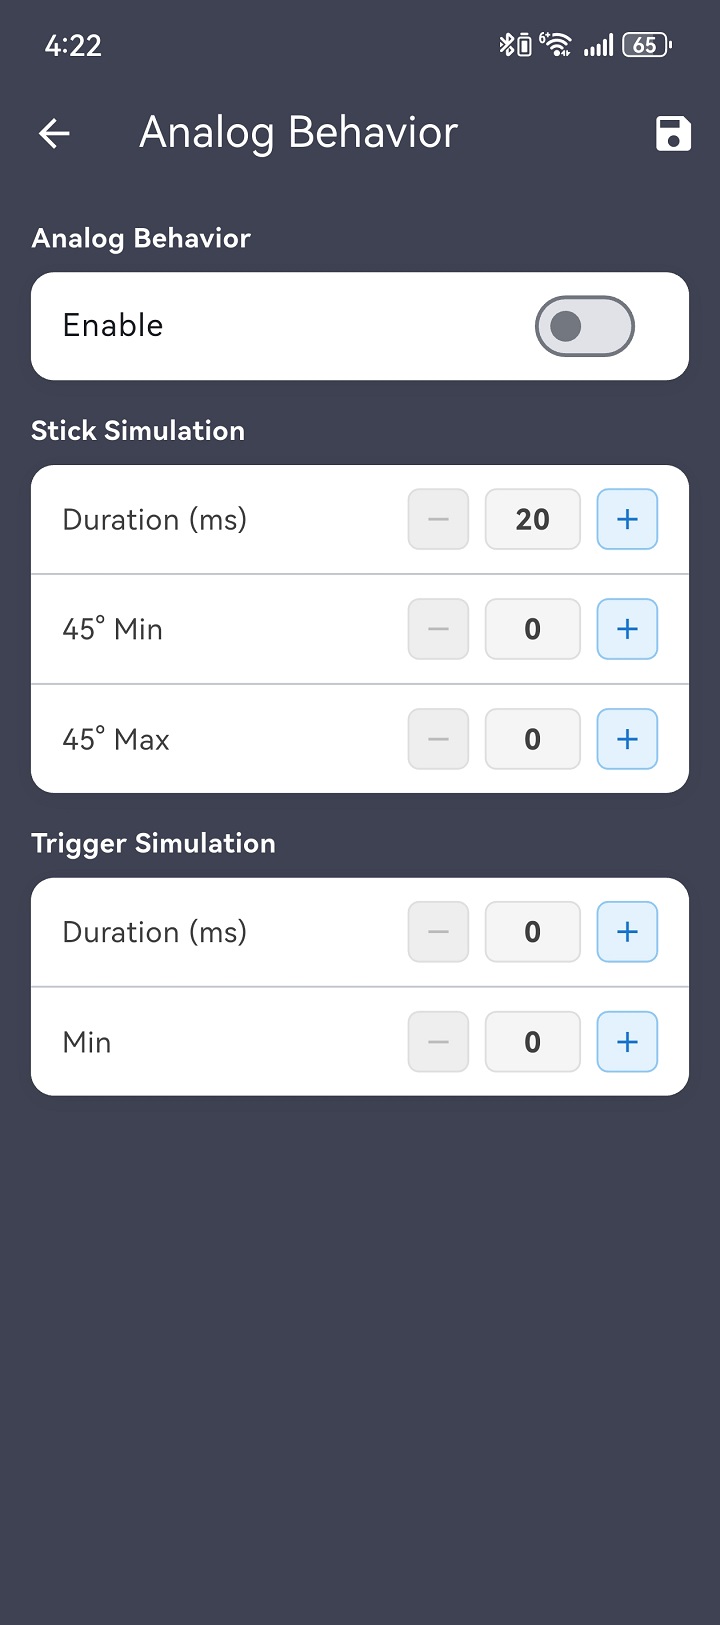
AB converts a digital key press into a timed analog stick/trigger movement - the controller sees the stick/trigger move, not a button press.
| Parameter | Range | Description |
|---|
| Enable | ON / OFF | Toggle AB for this sub config |
| Duration | 20–5000 ms | How long the analog stick moves |
| 45° Min/Max | 45°-89° | Defines the angular output range when W+A or W+D is pressed together. Min sets the lower-angle bound, Max sets the upper-angle bound, controlling how sharp or wide the diagonal feels. |
💡 Tip: A game requires analog-style input for certain actions — AB converts a key press into that analog signal.
Vibration
Route vibration feedback to a connected controller:
| Parameter | Options | Description |
|---|
| Device | None / USB1 / USB2–4 | Which physical controller receives vibration |
| Intensity | 0–100 | Vibration strength |
Saving Keybindings
Keybindings auto-sync to S2’s RAM as you edit. Changes are temporary until you tap Save to Flash — do this before powering off, or your mapping setup will revert.
2.4 - Flight & Arcade Stick
Flight stick, HOTAS, and arcade stick configuration on ReaSnow S2 — axis mapping, stick speed, and gyro-to-stick. Steering wheels are not supported.
S2 supports flight sticks (including standalone throttles), arcade sticks, and gyro-to-stick conversion. This page covers axis mapping, speed limits, and dead zone configuration for these peripherals.
⚠️ Warning: Steering wheels, pedals, force feedback, and any racing wheel subsystems are not supported on S2. See Specifications for the full unsupported features list.
Supported Peripherals
| Category | Status | Notes |
|---|
| Flight Stick (Joystick) | ✅ | Including HOTAS setups |
| Standalone Throttle | ✅ | Independent throttle quadrant devices |
| Arcade Stick | ✅ | — |
| Gyro-to-Stick | ✅ | Gyroscope sensor input converted to analog stick output |
| Steering Wheel | ❌ | Explicitly unsupported |
Stick Settings
These apply to both analog sticks detected by S2:
| Parameter | Range | Description |
|---|
| Left Stick Max Speed | 0–100 | Caps left stick movement speed. Lower = slower max tilt. |
| Right Stick Max Speed | 0–100 | Caps right stick movement speed. |
| Stick Dead Zone | 0–100 | Movement below this threshold is ignored. Eliminates drift from worn joysticks. |
| Speed Toggle Hotkey | Configurable | Assign a key to switch between full speed and capped speed mid-game |
Gyro-to-Stick
S2 can translate gyroscope motion from a supported controller into analog stick output — enabling motion-based aiming in games that do not natively support gyro.
| Feature | Detail |
|---|
| Gyro input source | Built-in gyroscope on supported controllers |
| Output | Converted to right stick analog values |
| Use case | Motion aiming in FPS games on platforms without native gyro support |
💡 Tip: Gyro-to-stick sensitivity is controlled through the stick speed settings above. Increase right stick max speed for faster gyro response.
Flight Stick Axis Mapping
Each analog axis on a flight stick can be mapped independently to any S2 input port:
| Setting | Options | Description |
|---|
| USB Port | USB1–4 | Which physical USB port the flight stick is connected to |
| Axis Type | X / Y / Z / Rx / Ry / Rz / Slider | 7 axis types — select based on your stick’s physical axes |
| Mapping Target | Independent per-axis | Each axis maps to a specific S2 input channel |
| Dead Zone | 0–100 | Axis dead zone — per-axis, not global |
A typical HOTAS maps:
- X axis → Roll (ailerons)
- Y axis → Pitch (elevator)
- Z axis → Rudder (twist or pedal)
- Slider → Throttle
Stick Response Curves
Multiple response curve types are available for analog sticks — choose based on your game and playstyle:
| Curve Type | Best For |
|---|
| Linear | Default — 1:1 stick-to-output mapping |
| Slow Start | Precision around center — flight sim formation flying |
| Fast Start | Quick response — dogfighting, arcade games |
Select the curve in the stick settings page. The curve applies to the analog stick output, similar to how the mouse curve editor controls mouse-to-stick translation (see Curve Editor).
3 - Community & Ecosystem
Config sharing, cloud backup, creator system, activation codes, and user accounts for ReaSnow S2.
Share, discover, and monetize configs through the S2 ecosystem.
| Page | What You’ll Learn |
|---|
| Config Sharing | Share your setup with an 8-digit code, browse official configs, and manage cloud backups |
| Creator System | Publish configs, generate activation codes (3 days to 3 years), and earn from your work |
| Account & Membership | Register, log in, verify email, manage your profile, and understand membership tiers |
3.1 - Account & Membership
User account system on ReaSnow S2 — registration, login, email verification, password reset, membership tiers, and profile management.
S2 uses a cloud account system that unlocks cloud backup, config sharing, and the creator platform.
Registration
Create an account from the login screen by tapping the “Register” link.
| Field | Requirement |
|---|
| Username | 3+ characters, letters + numbers + underscores only |
| Email | Valid email address — used for verification and password reset |
| Password | 6+ characters, must contain at least 1 letter and 1 digit |
| Confirm Password | Must match |
After submitting the form, you are redirected to the email verification page. A 6-digit verification code is sent to your email — it expires in 180 seconds. If you miss the window, tap “Resend” (60-second cooldown). Once verified, you are logged in automatically.
Login
Log in with your username or email plus password.
| Feature | Details |
|---|
| Login Method | Username or email + password |
| Password Visibility | Toggle eye icon to show/hide password while typing |
| Remember Me | Check to stay logged in — APP stores token, auto-logs in on next launch |
| Error Messages | Username not found / incorrect password / email not verified / account locked / network error — each shown as a clear inline message |
| Forgot Password | Link at the bottom of the login form |
Forgot Password
Tap the “Forgot Password” link on the login screen. Enter your registered email, and a verification code is sent. Verify the code, then set a new password.
Profile & Membership
The Profile tab (4th tab at the bottom) shows your account details and provides entry points to advanced features.
Membership Tiers
S2 has a 5-tier membership system shown as a badge icon on your profile:
| Tier | Badge | Core Benefits |
|---|
| Basic | 🥉 | Free — access official config library, basic cloud backup |
| Pro | 🥈 | Extended cloud storage, longer share code validity (14 days) |
| Premium | 🥇 | Additional cloud backup slots, priority config loading |
| Elite | 💎 | Expanded activation code quotas, advanced creator features |
| VIP | 👑 | Maximum quotas, premium support, early access features |
ℹ️ Info: Your membership tier affects cloud backup storage and share code validity options. Upgrade tiers are managed through the APP.
Creator Status
Separate from membership — a creator badge appears if you have been granted creator permissions. Creators can upload configs to the creator directory, generate activation codes, and monetize their setups. See Creator System for details.
Profile Page Sections
| Section | What You Can Do |
|---|
| Membership Badge | View current tier and upgrade options |
| Creator Badge | View creator level |
| Language | Switch between 8 supported languages |
| Config Backup | Access cloud config backups |
| My Shares | View active share codes |
| Creator Center | Manage creator directory and activation codes |
| BLE Debug | Access BLE testing tools |
| Firmware Upgrade | Check for OTA firmware updates |
| Log Out | Confirm dialog before signing out |
Why Create an Account?
Without an account, you can still use S2 locally — add official configs, record macros, and play. Creating an account adds:
- Cloud Backup: Save your configs online, restore them on any S2 device bound to your account
- Config Sharing: Generate 8-digit share codes to send your configs to friends
- Creator Platform: Publish and monetize your configs
3.2 - Config Sharing
Share your ReaSnow S2 configs via 8-digit share codes and cloud backup.
Content coming in Round 3.
3.3 - Creator System
Publish and monetize your ReaSnow S2 configs - creator directory, activation codes, and upload workflow.
Content coming in Round 3.
4 - Support & Troubleshooting
Troubleshooting guides, frequently asked questions, and changelog for ReaSnow S2.
Something not working? Start here.
| Page | What You’ll Learn |
|---|
| Troubleshooting | Diagnose issues by platform, peripheral, or LED status — with symptoms, causes, and fixes |
| FAQ | Quick answers to the most common questions about S2 |
| Changelog | Document revision history |
4.1 - Troubleshooting
LED indicators, error codes, common issues, and solutions for ReaSnow S2.
Content coming in Round 3.
4.2 - FAQ
Frequently asked questions about ReaSnow S2.
Content coming in Round 3.
4.3 - Changelog
Document revision history for ReaSnow S2 user guides.
Content coming in Round 3.